
You’re stuck in Grayscale mode if Photoshop only lets you select black, white, and a selection of gray shades when you’re choosing a color. You’ll be glad to know that there’s a simple solution to the problem, meaning that you can get things back to normal within just seconds.
The reason for your problem is likely to be that you’re working in the wrong color mode: the grayscale mode. If you want to work with a full range of colors, rather than just grays, then you’ll need to be working in either the RGB Mode or the CMYK Color Mode.
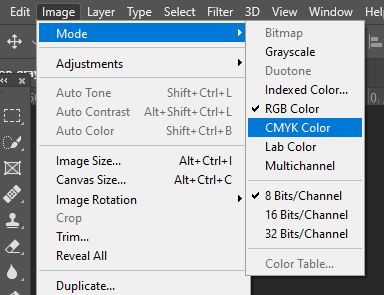
So, all you need to do is switch to the right color mode, by selecting Image > Mode > RGB Color or Image > Mode > CMYK Color from the options bar along the top of the screen.
Alternatively, you can also switch to color mode by using the keyboard shortcut Ctrl+Shift+U (Command+Shift+U on a Mac).
This will create a grayscale version of the image without permanently discarding the color information.
For more information on the issue, you can check out this discussion on Adobe’s Support Community site.
Table of Contents
What is Photoshop’s Grayscale Mode?
The grayscale color mode in Photoshop uses a variety of shades of gray to form an image, meaning that all colors are defined by a distinct shade of gray. A regular 8-bit image will be composed of up to 256 different shades of gray.
Every pixel within a grayscale image is assigned a specific brightness value ranging from 0 (black) to 255 (white).
Working in this color mode can be useful when you want to focus only on the tonal values within an image that you’re working on.
For instance, it could come in handy for artists producing a digital painting, as they would be able to view just the tones in a reference image, allowing them to see which areas should be lighter and which should be darker in their own painting.
It can also be good to preview how a grayscale effect would look on one of your images, without making any permanent changes to it, since you can just switch the color mode back to RGB or CMYK to see the full-color image again.
Why is your Photoshop stuck in Grayscale Mode?
You created your Photoshop document in Grayscale Mode.
One reason for why you may be unintentionally working in grayscale mode within Photoshop is if you have created a new file whilst having word processing text, or something similar, already active on your clipboard.
This can often make Photoshop, or Photoshop Elements, want to produce a grayscale image, so it will default to creating a file in which the color mode is grayscale, rather than RGB- the typical default color mode.
To make sure this doesn’t happen in the future, just check the color mode that’s displayed in the New File Window when you’re in the process of making a new document.
If it isn’t set to the color mode that you want to use, then you can simply change it in the dropdown menu, then hit Create to create a new document that uses the correct color mode.
Another reason why Photoshop might have defaulted to the grayscale color mode for a particular project is if you were using that color mode when working on the last document you had open.
The program tends to remember your last settings and preferences, which can be annoying if you don’t want to work in grayscale for your new project.
To avoid this problem, again, just ensure that the color mode is set to RGB or CMYK Color when you’re in the process of creating a new document. You can set this in the New File Window that appears after choosing File > New, as detailed below.
You have selected one channel instead of all the RGB channels:
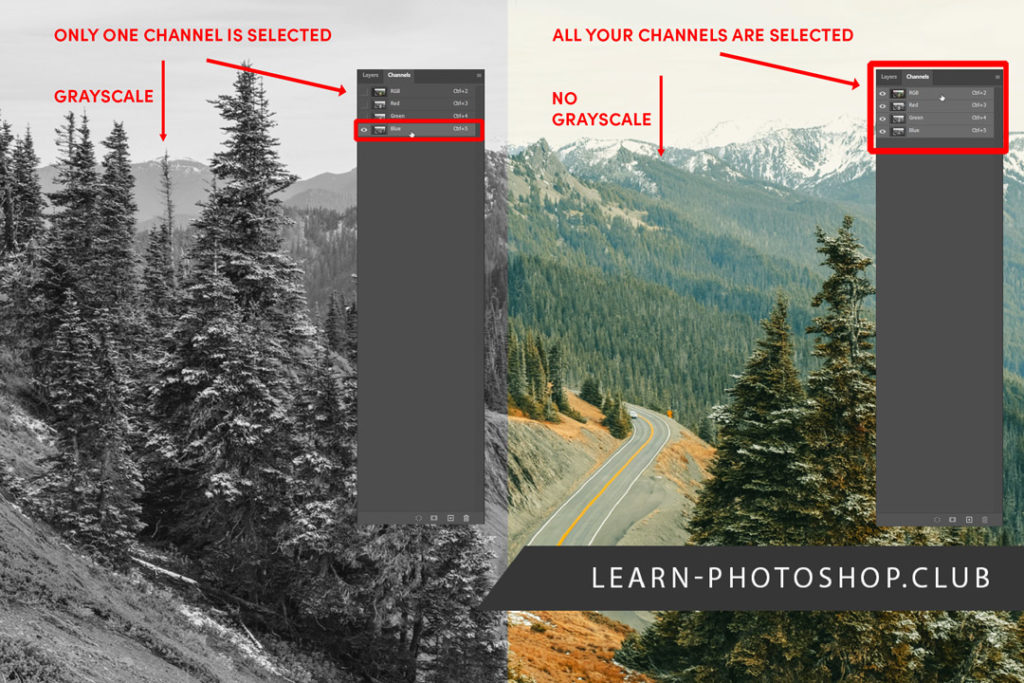
You want to check your Channel Window, it should be located just next to your layers panel. Make sure that all your Channels are selected. You can do it by simply clicking on the “RGB” Channel on top.
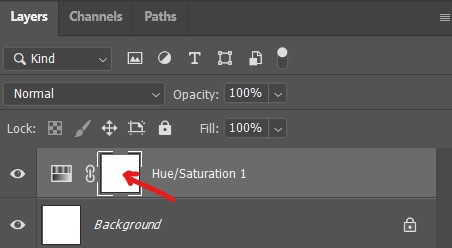
You have an Adjustment Layer desaturating your photo
Indeed, it is possible that in your layer panel you accidentaly created Hue & Saturation Adjustment Layer with the Saturation slider put to -100.
In this case, you just want to either delete this Adjustement Layer or put the Saturation back to 0.
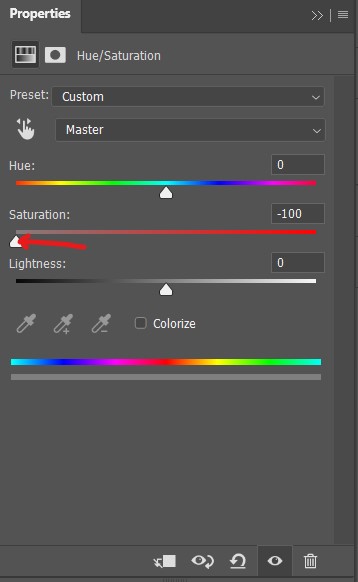
By the way, it can also be a Black & White Adjustment Layer or a Vibrance Layer affecting your colors.
A selected Layer Mask affects your Color Picker
If you can select only black and white values with your Color Picker it is because you have a Layer Mask selected.
Indeed, the Color Picker will only select value from your Layer Mask which are by default in Grayscale.
How Can You Exit the Grayscale Mode in Photoshop?
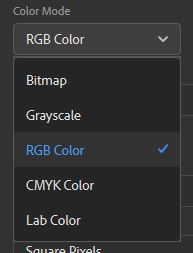
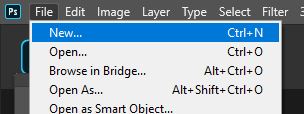
If you haven’t yet created a new file, or you can easily start the project over again, then you can just create a new document that will be using the right color mode from the start. Open Photoshop and head to File > New to create your file.
In the window that opens up, use the dropdown menu near the bottom to change the color mode from Grayscale to RGB Color or CMYK Color. Check the final section of this article if you’re unsure of whether you should choose RGB or CMYK.
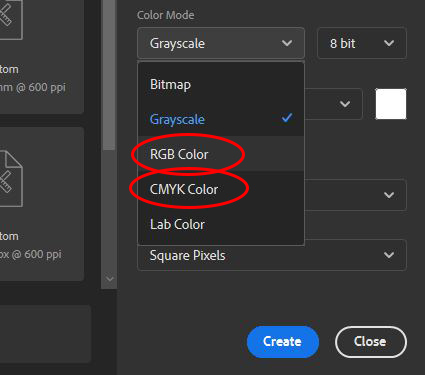
Then just hit Create to open a new file that allows you to work in full color!
Luckily, even if you’ve already started working in a document, you can still fix the issue without having to start over again from scratch.
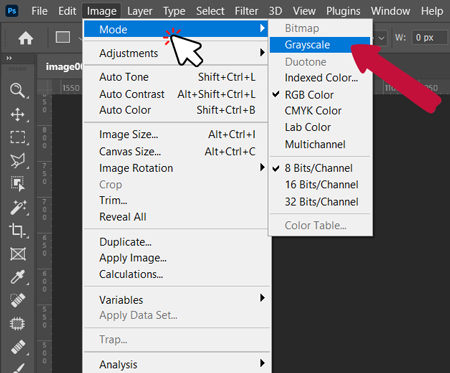
Simply select Image > Mode > RGB Color from the top of the screen to change the color mode, allowing you to work with the full range of colors rather than just shades of gray without having to lose any of the edits you’ve made.
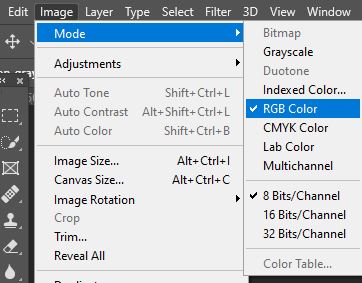
If you want to work, instead, in the CMYK Color Mode, then head to Image > Mode > CMYK Color.
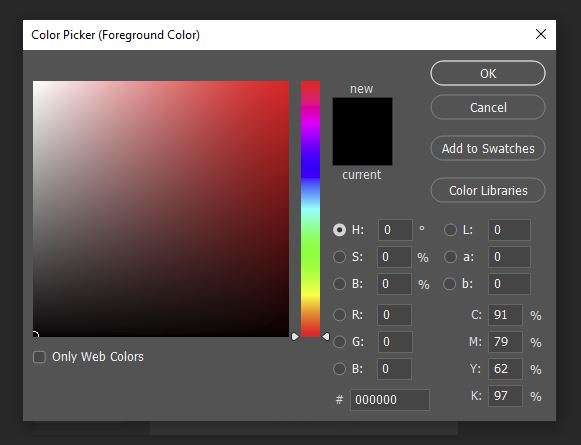
You can check whether this has been effective at solving the issue by heading over to the color picker by clicking on one of the squares shown in the image below.

Hopefully, you’ll now see that Photoshop allows you to select any color rather than just any shade of gray.
Should You Switch to RGB or CMYK?
The general rule is that RGB should be used for digital work and CMYK should be used for designs that will be printed.
Of course, this doesn’t stop you from printing an RGB file, but if you’re sure that the final destination of the design will be on paper, then you might want to choose CMYK instead.
The RGB Color Mode tends to be used when the final destination of the piece is a digital screen- anything from computer monitors to smartphones, televisions or cameras.
It’s useful in designing websites or applications, creating online identities for brands, and producing social media content, videos or infographics.
On the other hand, the CMYK Color Mode is usually used when producing branding material that will be printed onto business cards and other physical products, when creating physical advertising material such as flyers, brochures or billboards, and when designing merchandise, packaging or menus.
In other words, use CMYK when creating files that will be printed. Photoshop will normally set the color mode to RGB by default since it’s the most commonly used color format.
Related Guides:
– Why Photoshop changes your colors (and what to do)
– How to Change Color Profiles in Photoshop – 2 Easy Ways
BONUS VIDEO TUTORIAL
That’s about all there is to know about why you might be working in Photoshop’s grayscale color mode and what to do to exit it and solve the issue, getting the colors back to normal! Want to find out more about how to solve the problem?
See our tutorial that walks you through the issue and the different solutions.
Here are some of my favorite Photoshop tools:
Thank you for reading this article. I hope you found it helpful as you’re using Adobe Photoshop. Here are some tools that I use daily while retouching or editing that made my life easier. I hope you’ll also find them as useful as me. These are affiliate links, so if you do decide to purchase any of them, I’ll earn a commission.
But in all honesty, these are the exact tools that I use and recommend to everyone, even my closest friends and family.
Tablet: I remember purchasing my first tablet back in 2011. It was the smallest Wacom available at that time, I think it was an A5 format. Tablets make a huge difference with Photoshop and I can’t work without one nowadays. I recently switched to the amazing Xencelabs Medium Bundle and I just love it.
Quick Fixes: Whenever I need to edit pictures quickly, I use the AI-powered Luminar photo editing tool.
Content Creator Essentials: If you’re taking pictures, video footage, or any other types of media, I recommend you the Samsung T5 external SSD to safely backup and transport your files. Regarding my working station, since I’m always moving from one place to another, I’m using the ASUS ZenBook Pro Duo 15. Its second screen comes in really handy when working on Photoshop.
Hey, I'm a Professional Retoucher making $10k a month thanks to Photoshop.Register to my newsletter to get freelancing tips and a FREE Brush Pack in Bonus! My Newsletter

