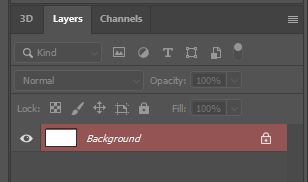
I am sure we can all agree that encountering an issue or an abnormality when using Photoshop is both extremely irritating and stressful. These feelings are intensified when you cannot figure out why the problem is occurring, despite trying to do what feels like everything.
But, luckily, if your problem is that your layers are appearing red in the Layers Window, then you don’t have to spend any more time worrying! In this article, we will reveal how you can solve the issue in just a matter of seconds.
In short, the problem can be solved by hitting the Q key on your keyboard. You can continue reading to understand why this is the case.
How Can You Tell if This is the Issue You Are Experiencing?
This article will discuss the solution to the problem in which one of, some of, or all your layers are appearing red instead of appearing to be of their usual mid-gray color.
So, if your Layers Window looks something like the one shown in the example below, then you have come to the right place and should simply press the Q key to bring everything back to normal!
After pressing the Q key, your Layers Window should look normal again, as shown in the example below.
What Does Pressing the ‘Q’ Key Do?
The ‘Q’ key on your keyboard is automatically assigned as the keyboard shortcut to toggle in and out of Photoshop’s Quick Mask Mode. In other words, clicking on the Q key has the same effect as clicking on the Edit in Quick Mask Mode icon near the bottom of the toolbar down the left side of the screen.
Note that this icon resembles a dotted circle in the centre of a rectangular outline, as shown below:
Clicking on this icon, or pressing the Q key, whilst not in the Quick Mask Mode will cause your view of the document to change into Quick Mask Mode. Similarly, doing the same thing again will bring your view back to normal.
What is Quick Mask Mode?
Photoshop’s Quick Mask Mode displays selections in a different way, allowing you to see more clearly which areas of the images are selected and which are not. They can be really useful when making selections and local adjustments.
The mode particularly comes in handy when making selections that have feathered edges, since you can see the extent to which the edge of the selection is feathered through looking at the harshness of the boundary and how much the surrounding areas are affected.
It does this by temporarily applying a semi-transparent red tint to the area inside your selection. The mask can be edited using any painting tool with either the color black or the color white.
BONUS
That is about all there is to know about why the problem is occurring, how to solve it, and why the solution works! If you would rather learn by watching a video of the solution being carried out, then feel free to take a quick look at this video by 2-Minute Design on YouTube.
If you’re new to Photoshop and would love to have a complete guide to kick-start your learning process, check this complete guide for beginners we wrote here.
Remember that if you are ever experiencing issues with Photoshop, you can always head over to the Adobe Help Center or the Adobe Support Community to ask questions or read the answers to those which have already been answered.
Hey, I'm a Professional Retoucher making $10k a month thanks to Photoshop.Register to my newsletter to get freelancing tips and a FREE Brush Pack in Bonus! My Newsletter


