Very often, Photoshop users find themselves asking: ‘what’s the difference between the program’s Fill and Opacity options? Do they not both have the same effect on a layer?’. These are both valid questions since both functions are used to control an individual layer’s transparency.
With an ordinary layer, you would be right in thinking that the effect of each function is the same: when you decrease the value on each slider, the transparency of the layer increases. However, the main difference becomes visible when layer styles are applied to that layer.
In short, when applied to a layer with layer styles, edits to the Opacity value affect both the contents of the layer and the effects/styles added to it, whilst edits to the Fill value affect only the contents of the layer.
So, let’s go ahead and take a deeper look at the difference between Photoshop’s Opacity and Fill options! Before we dive in, if you would first like to learn more about how to use Photoshop, then feel free to check out our free guide to the program for beginners.
There is a video at the end of the article explaining you everything, click here to jump right to it.
What Are the Opacity and Fill Options?
Before we begin discussing the differences between the two functions, let’s first explore them individually.
Both the Opacity and Fill options can be found in the top-right corner of the Layers Window, which should be located at the bottom right of your screen.
The Opacity option allows you to increase or decrease the opacity of a particular layer using a slider. A higher value for the Opacity results in the layer being more visible- in other words, less of the content on the layers beneath it shows through. Let’s take a look at the example below:

As you can see, when the text layer has an opacity of 100%, any content that is behind the text on the layer beneath it is completely hidden. With an opacity of 50%, you can still partially see both layers, whilst with an opacity of 0%, the text layer becomes completely hidden and only the image beneath (by ShonEjai from Pexels) is visible.
The Fill option pretty much does the same thing when an edit to the value is applied to a typical layer (that is, one without layer styles applied to it). Let’s take a look at the example below, using the same layers:

Do you notice that the same effect has occurred? This will always happen with layers that have no applied styles. Therefore, you can actually use the Opacity and Fill options interchangeably as long as your layer has no styles applied to it.
What is the Difference Between the Opacity and Fill Options?
So, you have now seen a situation in which there are no visible differences between the Opacity and Fill options. But now, let’s go ahead and demonstrate a situation in which there would be a difference in the effect that changing each variable yields.
As we mentioned earlier in the article, the differences become evident when the edits to the transparency are applied to a layer with layer styles applied to it. Layer styles let you add effects to a layer, such as a shadow, a bevel and emboss effect, or a gradient overlay.
The difference, therefore, between the options becomes apparent when we look closely at how the transparencies of these layer styles, or effects, are changed upon editing the Opacity or Fill value.
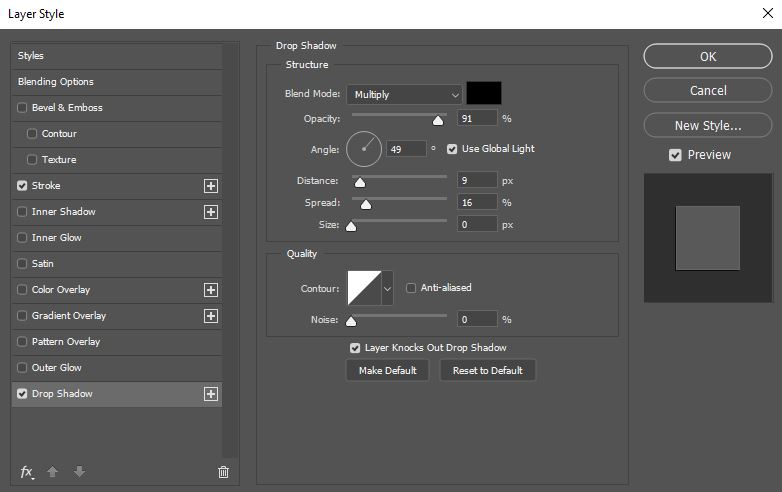
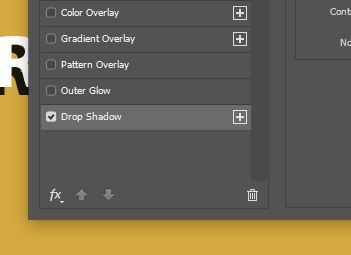
To demonstrate what happens, we will apply a simple edit to the style of our text layer by adding a shadow and a stroke. This can be done by double-clicking on the relevant layer in the Layers Window to open the layer effects tab, which should resemble the one shown below:

In this newly opened window, we will then add some layer styles and edit the properties of these until we are happy. Here is the effect we created:

So, with the layer styles applied, let’s now explore the effects of the two transparency-editing functions and compare the outcomes.
By decreasing the Opacity of the layer, you should get an outcome something like the ones shown in the examples below:

As you can see, decreasing the opacity of the layer will resultantly decrease the opacity of the whole layer and its styles. It is clear that the shadow has become more transparent, and the stroke has faded along with the rest of the text. With an opacity value of 0%, the entire layer has been made invisible along with the styles that were applied to it, like the shadow and the stroke.
——
Now, by contrast, this is the effect achieved by decreasing the Fill of the layer:

Hopefully, you can now see that editing the values of each of these variables has very different effects when the edits are applied to a layer which has styles applied to it.
At 100%, both the layer’s contents and styles are fully visible. By decreasing the opacity to a value of 50%, you will notice that whilst the content of the layer (the text itself) is becoming more transparent, the transparency of the stylistic elements (the shadow and the stroke) is remaining the same. With the opacity at 0%, the text itself has been made entirely invisible, whilst the stylistic elements are still fully visible.
To Resume
So, to summarise this difference in the effects of each function, it could be said that decreasing the Opacity of a layer with layer styles applied to it will make both the layer itself and the stylistic elements less visible, whereas decreasing the Fill value of a layer will make just the layer itself less visible, preserving the transparency of the stylistic effects (which will always remain 100% visible)
But, let’s say you wanted to create an effect opposite to that created by decreasing the Fill value, and you wanted to decrease the opacity of a layer style but keep the immediate contents of the layer fully visible. How could you go about doing that?
Well, this can be done in the Layer Styles Window, which, as you may be able to recall, can be opened by double-clicking on the layer to which you want to apply the effects.
Within this window, there should be a list down the left which shows all the possible stylistic elements that you can add to your layer. At this point, you will need to click on the name of the ‘layer style’ that you want to edit. For instance, we would like to decrease the opacity of the shadow in our example, so we will select the heading Drop Shadow from this list.

Clicking on any one of these headings will cause a new controls tab for the setting to appear in the right section of the window. Here, you can find lots of options through which you can customise the appearance of the effect.
In this case, we are interested in the Opacity option, as shown below.

Once you have located this option, simply either type in a new specific value for the opacity of the stylistic element, or use the slider which you can drag to either the right or the left to increase or decrease the opacity, respectively.
When you are satisfied with these changes, click the OK button to apply them, and you should then have managed to achieve an effect that is opposite to the one created using the Fill function!
Why Does This Difference Matter?
Because of what happens when you decrease the Fill value of a layer with layer styles applied to it, you can create some awesome text effects in which the shape or outline of a piece of text is created entirely by elements such as glows, shadows, and strokes. The same thing applies to shapes and potentially image layers.
Here are just a few of the examples of what we managed to create by simply playing around with layer styles and fill values for a few minutes:

For example, as shown in the first image, you could create an effect in which the text is only made up of its shadow by adding a Drop Shadow to the text and decreasing the Fill value to 0%.
You could create an effect where you can see a glow around an invisible box, as shown in the second image, by adding an Outer Glow to a square shape and decreasing the Fill value to 0%.
Or you could even edit the text so that it appears to just consist of an outline, by adding a stroke to the text and decreasing the Fill value to 0%.
BONUS
And that is about all there is to know about how to differentiate between Photoshop’s Opacity and Fill functions! Want to find out more about the difference between them and how this difference can be exploited? Then take a look at this video by PiXimperfect which provides a great demonstration of the topic.
Hey, I'm a Professional Retoucher making $10k a month thanks to Photoshop.Register to my newsletter to get freelancing tips and a FREE Brush Pack in Bonus! My Newsletter


