How to Add a Lens Flare Effect in Photoshop
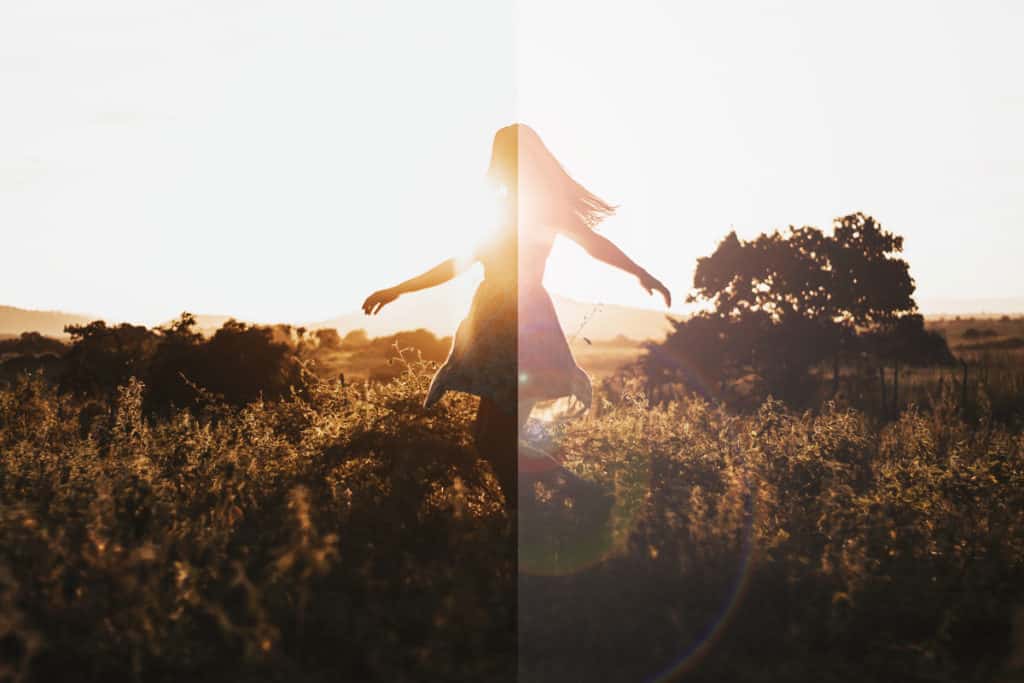
Light is one of the most important aspects of visual arts. Whether the light is naturally formed in a photograph, or adjusted within Photoshop, it’s able to effectively communicate the tone of an image, establish a mood, or just improve the appearance of it in general.
In this tutorial, we will discuss how to add a lens flare into an image with Photoshop- a technique that will allow you to take the lighting in your photographs to the next level. Using Photoshop’s handy Lens Flare Filter, layers, and blend modes, we can create an effect that is both quick and convincing.
Whilst this process is fairly simple, you may, if you are a beginner, wish to familiarise yourself more with Photoshop, in order to understand and gain more from the tutorial.
A great way to do this is to check out some of the most useful video tutorials for Photoshop, a list of which we have compiled here.
Step 1: Open your Image
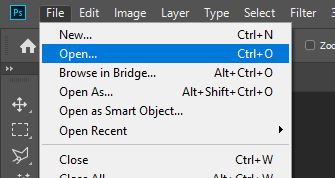
Of course, we will first need to have the image to which we wish to add lens flares open in Photoshop. If you are unsure of how to do this, simply head to File > Open, and choose the relevant image from your files.
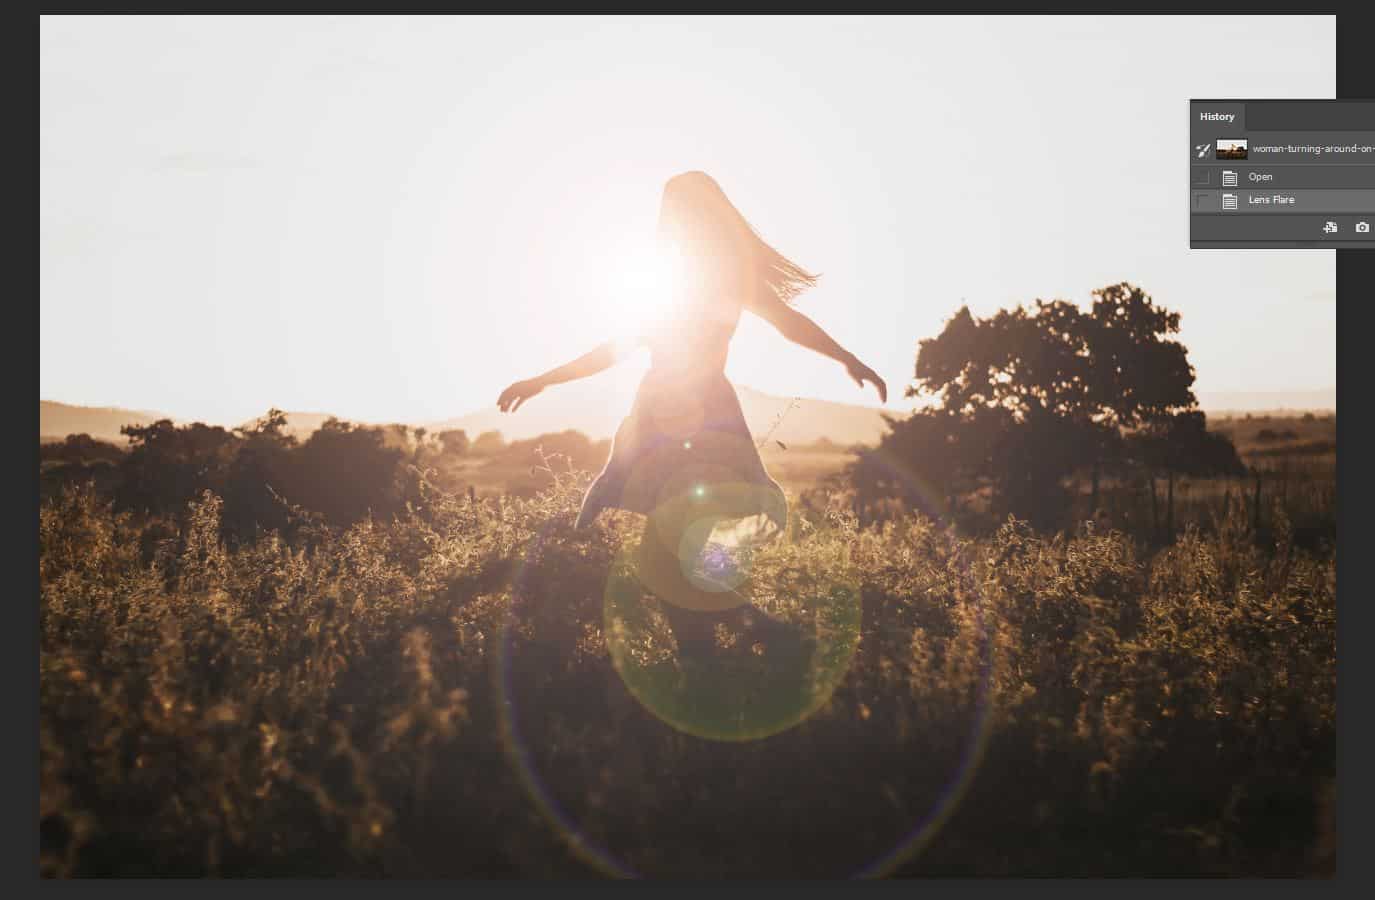
In terms of choosing an image, the best results from this method occur when we apply the flares to a photo that has a visible light source somewhere within it, such as the sun, or a spotlight. For this tutorial, we used this photo by Jackson David from Pexels, which was perfect since the sun was situated in the background of the scene.
Step 2: Create the Lens Flare Filter
Once you have opened your image in the program, you can apply the Lens Flare Filter. Now, for this tutorial, we will be walking you through a non-destructive method of adding a lens flare. This means that we will avoid making any edits directly to the original image layer, and instead, make all adjustments on a separate layer so that we can preserve the original and head back to it at any time.
But for the purposes of positioning the lens flare, we will first apply the Lens Flare Filter directly to the original image layer, then undo it and use a shortcut to re-apply the same effect to a separate layer.
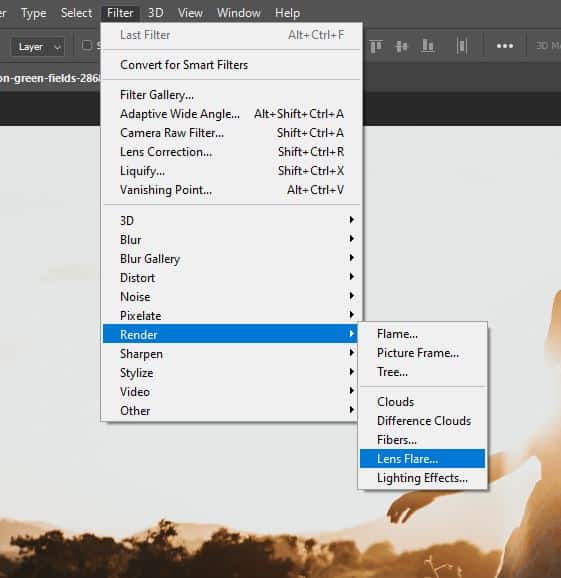
So, let’s begin by heading to Filter > Render > Lens Flare.
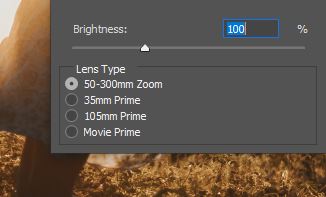
Doing this will open the Lens Flare Dialog Box, containing options for four different types of lenses: 50-30mm Zoom, 35mm Prime, 105mm Prime, and Movie Prime. These can be chosen in the Lens Type section, at the lower left of the window.
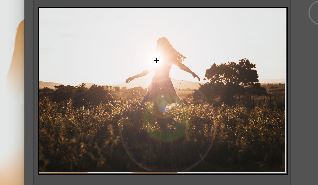
Feel free to try out all of these, whilst keeping an eye on the different effects that are created in the Preview Area, and experiment until you find an effect that suits your image.
Other than the Lens Type, there are also options that allow you to change the brightness and positioning of the flare. To adjust the brightness, simply drag the Brightness Slider to the left or right, to decrease or increase the intensity of the effect, respectively.
The positioning of the lens flare can also be changed to fit in with your photo. To set the position, click inside the preview area to indicate where you want the centre of the flare to sit. Alternatively, you can set this position by clicking on the cross icon in the preview area, and dragging it to move it around.
In most cases, it is best to place the centre directly over the centre of your visible light source, for example the sun, as this will produce the most realistic effect.
Once you are happy with all these settings, click OK.
Step 3: Undo the Lens Flare Filter (to be able to edit it afterwards)
You should now see that we have created a lens flare effect that sits directly on the image layer. Whilst this is the outcome that we want in terms of appearance, we need to instead produce the lens flare on a separate layer in order to work non-destructively, rather than making a direct change to our original image.
To solve this issue, and not make any permanent changes to the image, we’ll undo the effect and re-apply it on a different layer, now that we know where we want to position it.
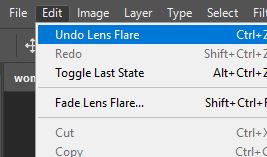
So, go ahead and choose Edit > Undo Lens Flare from the bar along the top of the screen, or use the keyboard shortcut Ctrl + Z [Win] / Cmd + Z [Mac].
Step 4: Create a New Black Layer
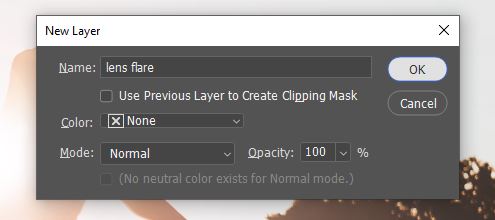
We’ll next want to add a new empty layer, on which we can re-apply the Lens Flare Filter. Hold down Alt [Win] / Option [Mac], whilst clicking on the New Layer icon at the bottom of the Layers Window.
Doing this will open up a window in which you have the option to name the new layer. Name it something like ‘Lens Flare’ and click OK.
You should now have created a new empty layer, which you will be able to see in your Layers Window but won’t have made a change to the appearance of the piece in the Document Window, since it is, effectively, invisible.
At this point, we cannot yet re-apply the effect, as it is impossible to add the Lens Flare Filter to an empty layer. We can solve this issue by filling the layer with black- a color that we can make invisible using blend modes later in the process.
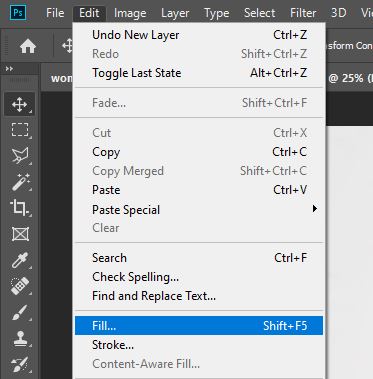
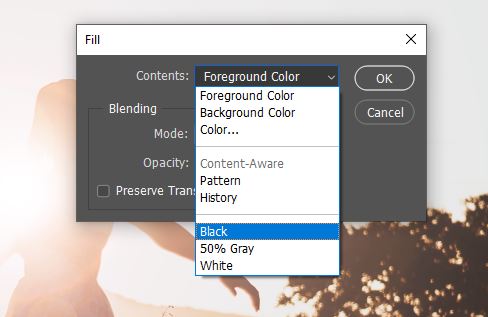
To fill the layer, head along the top of the screen to Edit > Fill.
Selecting this will open up a window. Set the Contents to Black, by clicking on the drop-down menu at the top of the window. Once you’ve done this, click OK to close the window and apply the edits.
Your document window should now, temporarily, appear black, covering up the original image.
Step 5: Re-apply the Lens Flare on the Black Layer
Luckily, Photoshop has a feature which means that it remembers all the settings from the filter that we applied previously, including, in this case, the positioning and brightness of the lens flare. So, we have a couple of shortcuts that we can use to re-apply the same effect that we had before.
The last filter that we applied will always appear as the first option at the top of the Filter Menu, and so can be accessed by clicking Filter > Lens Flare (the top option) from the bar along the top of the screen.
Alternatively, to do this even quicker, you can simply hit CTRL + F [Win] / Cmd + F [Mac] on your keyboard.
You should now be able to see that the same lens flare as before automatically appears in the same position that we previously set it to, and at the same level of brightness, but this time on our ‘Lens Flare’ black layer instead of on the original photo itself.
Step 6: Change the Blend Mode
So, now that we’ve successfully added our lens flare onto the correct layer, the only major issue that remains is that we can still see the black that shows behind the lens flare on the layer, and therefore cannot see the original image.
We can easily solve this through the use of blend modes. These come in handy all the time when you are using Photoshop, so once you’ve learnt how to use them, and what each one does, you’ll be able to apply the skill to pretty much anything you’re working on.
For this method, we will choose the blend mode ‘Screen’ in order to hide the blacks in the layer, making them invisible and therefore eliminating the solid black background.
To change the blend mode, there is a drop-down menu located in the top left corner of the Layers Window. Click on this and choose Screen from the list that pops up.
The black ‘background’ should have now disappeared, and you should be left with just the lens flare and the image beneath it.
Since the flare and the image are both on separate layers, you can, whenever you want to, make either of the layers invisible to view the other one in isolation. This can be done easily, by clicking on the Visibility Icon (displayed by an eye) to the left of the layer in the Layers Window.
To make the layer visible again, simply click on the icon again.
Step 7: Adjust the Colors of the Lens Flare
Although the effect is looking pretty good by this point, there are a few more things that we can do in order to make it appear more convincing. The first of these involves making adjustments to the hue and saturation of the lens flare, to make the colors within it match those in the original image.
First, make sure the layer that we titled ‘Lens Flare’ is selected in the Layers Panel. If it isn’t the highlighted, active, layer, then you can make it so by simply clicking on it.
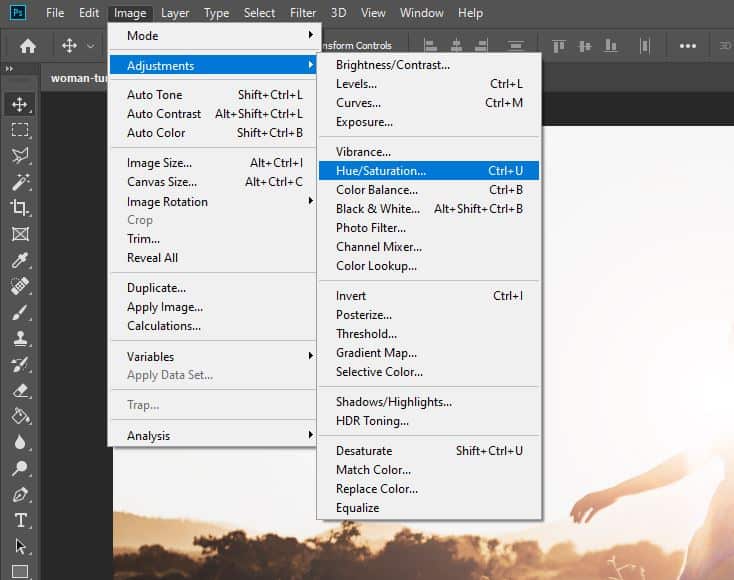
Let’s then head along the top of the screen to Image > Adjustments > Hue / Saturation.
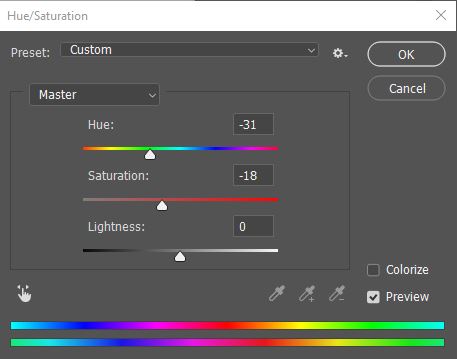
Doing this should open up a window, in which there are two sliders entitled ‘Hue’ and ‘Saturation’. Changing the values on the Hue slider will, in effect, change the colors themselves (for instance, allowing you to turn a blue into a green).
The value that you set on the Saturation slider will determine how intense your colors are. A high saturation will mean that your colors are very intense, whilst a low value would make the colors highly desaturated, and almost grayscale.
Click and drag on the sliders to change the values, and experimen
Step 8: Add Blur to the Lens Flare
Another thing that we can do to make the outcome more convincing is to add a Gaussian Blur to the Lens Flare layer. This type of blur is used frequently by designers and visual artists and will allow us to make the edges of our flare less sharp, almost blending it in with the original image.
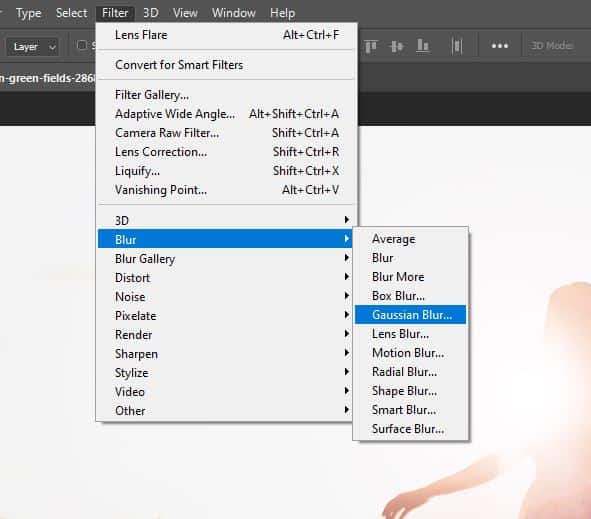
So, to add this blur, let’s head to the bar along the top of the screen and select Filter > Blur > Gaussian Blur.
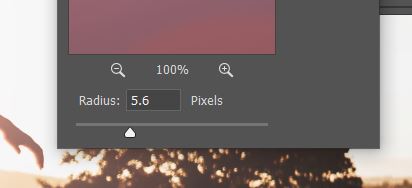
Doing this will open up a dialog box containing an option entitled Radius. By setting a value for this variable, we can decide how blurry we would like the layer to become.
A larger radius would mean that the flare is softened to a larger extent, and therefore becomes blurrier, whereas a smaller radius would cause the flare to be softened to a smaller extent, becoming slightly blurry, but still fairly sharp.
To set the value, simply drag the slider left and right, keeping an eye on how what you are doing is impacting the image.
And that’s about it! You should now have an image with a lens flare across it, hopefully taking the picture to a new level. Adding lens flares can be extremely useful during the process of retouching photographs, particularly landscapes, and can be the key to creating captivating lighting within an image.
BONUS
Want to learn more about the processes discussed in this tutorial?
Check out this video by Photoshop Essentials, which details the same method, or this video by PHLEARN, which shows an example of how the technique could be applied to portraits, and further explains the concept of working non-destructively.
Hey, I'm a Professional Retoucher making $10k a month thanks to Photoshop.Register to my newsletter to get freelancing tips and a FREE Brush Pack in Bonus! My Newsletter

