Saving your Photoshop files in the .PNG format can be really useful- especially when you’re hoping to preserve transparency and keep a small file size. But what if the option isn’t available to you? Issues like this are definitely irritating but luckily, we’ve compiled a variety of potential solutions that you can try.
In most cases, Photoshop cannot save a PNG file because of incompatible color modes (CMYK, Lab Color, or Multichannel isn’t working for saving in PNG).
Secondly, you should ensure that your document is 8 or 16 bit/channel. Anything bigger than and Photoshop won’t let you save in PNG.
However, these different issues could easily be avoided by using the Save For Web option instead of the Save As command.
In this article, we will walk you through these solutions and offer you a step-by-step tutorial
Table of Contents
Check the Color Mode to Save in PNG
The most common reason why Photoshop isn’t letting you save your file as a PNG could be because the properties of your document make it unsupported by the format.
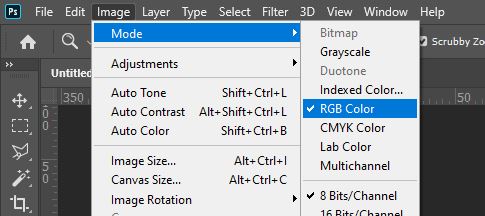
It is important to note that Photoshop will let you save your document in PNG only with the following color modes:
 RGB, Bitmap, Grayscale, or Indexed Color mode will let you save in PNG.
 CMYK, Lab Color, or Multichannel isn’t working for saving in PNG.
Since its original purpose was for transferring images on the internet, the file format isn’t intended to support documents that are made for print. Therefore, if you are working in the CMYK mode, then Photoshop won’t let you export your file as a PNG.
Fortunately, it’s easy enough to change the color mode of your file even after you’ve started working on it, by selecting Image > Mode > Choosing your preferred color mode.

Now that you’ve changed the color mode to one that is supported by the format, you can simply head to File > Save As and save the file as you usually would.
Related Guides:
– Why Photoshop changes your colors (and what to do)
– How To Remove All Of One Color In Photoshop
Make Sure Your Document is 8 or 16 Bit/Channel
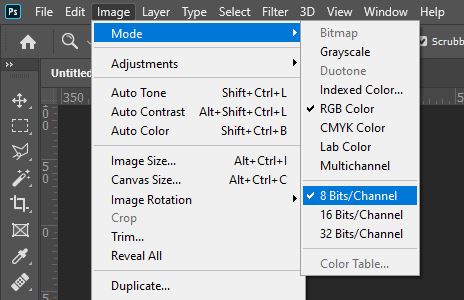
The bit-depth of your file also determines whether it can be supported by the .PNG format. PNG files can only have 8 or 16 bit/channel, so if your document has a different property, then it may cause Photoshop to prevent you from exporting it in certain formats.
Luckily, we can change this setting too. To change the bit-depth of your file, you can head over to Image > Mode then select either 8 Bits/Channel or 16 Bits/Channel from the flyout menu.

After changing this property, you will hopefully be able to save your file as a PNG. To do so, choose File > Save As and select PNG from the list of file formats.

After reading through the potential solutions, hopefully, you have managed to find a method to get you back to designing and saving your work without unnecessary difficulties!
If you want to see the process of solving the issue by changing the color mode in more detail, then feel free to check out this video by Gayan Deshapriya which quickly demonstrates the steps involved.
How Can I Save in .PNG Format?
To begin with, let’s recall the usual process for saving a file as a PNG. Typically, we can save a file as a PNG using the Save As command.
However, this only works if your file is in RGB, Bitmap, Grayscale, or Indexed Color mode. Any other color mode won’t work for saving in PNG.
Option 1 – Use the Save For Web Command (🥇this will always work)
When we’re exporting Photoshop files, it’s often habitual to choose the Save As function. However, as we mentioned before, there are some cases in which other options might be more suitable.
If the Save As command isn’t giving you the opportunity to save files in the .PNG format, then Save For Web is a great alternative that often solves the issue easily.
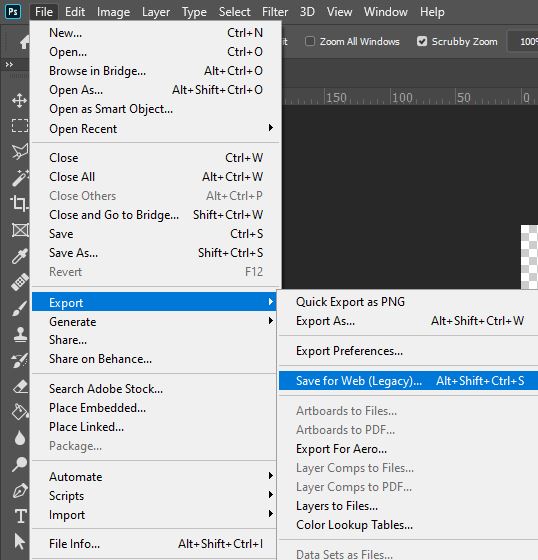
To save a file in this way, simply go ahead and select File > Export > Save For Web (Legacy) from the bar along the top of the screen.

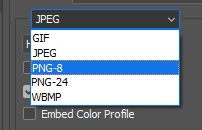
Within this window, select PNG from the list of formats.

And hopefully, your file will save successfully!
Option 2 – Use the Save As Command
If your file satisfies these previously mentionned criteria, then you can simply head to the Menu Bar at the top of the screen and select File > Save As from the top-right corner.

Within the Save As window, you can choose PNG from the format menu, as shown below.

So, what if your file doesn’t meet the criteria for saving in the .PNG format this way? Let’s take a look at our other options now.
Key Takeaways
By following the tips outlined in this article, you should be able to quickly fix the most common issues preventing you from saving your work as a PNG.
Remember to check the color mode and bit/channel settings of your document, and use the Save For Web command for a quick work around to save your file in PNG.
I hope that these tips helped, and that you can enjoy the thrills of working in Photoshop with no restrictions!
Hey, I'm a Professional Retoucher making $10k a month thanks to Photoshop.Register to my newsletter to get freelancing tips and a FREE Brush Pack in Bonus! My Newsletter


