Saving large Photoshop files can often be a real pain, particularly when it comes to saving them as JPEG images. Photoshop doesn’t offer the option to save a file as a JPEG if the file is larger than 65535 x 65535 pixels, meaning that for an aspect ratio of 1:1, the limit is around 4 gigapixels.
So, if your file exceeds these limits, how can you save it as a JPEG? Well, the process simply involves reducing the size and quality of your file until Photoshop offers you the option to save it as a JPEG once again. Let’s take a quick look at the method, which attempts to preserve the high quality of your file as much as possible, below:
- Open the file in Photoshop
- Go to File > Export > Save for Web (Legacy)
- Choose an Export Quality
- Choose JPEG as the file format
- Click Save and set the new image’s name and location
- If the file is still too big, reduce the image size until the JPEG format is available
- Also save the file as a PSD if you intend to use it again later
There is a video explaining to you how to batch resize large photoshop files as jpegs, click here to jump right to it.
1: Open the File in Photoshop
As always, let’s begin by opening the file in Photoshop. To do this, launch the program then head along the top of the screen to File > Open.

Doing so will open a window in which you can browse your files to find the right document. Click on the large Photoshop file that you want to save as a JPEG and press Open.
2: Go to File > Export > Save for Web (Legacy)
Once you have opened your file in Photoshop, head to the bar along the top of the screen. From here, select File > Export > Save for Web (Legacy).
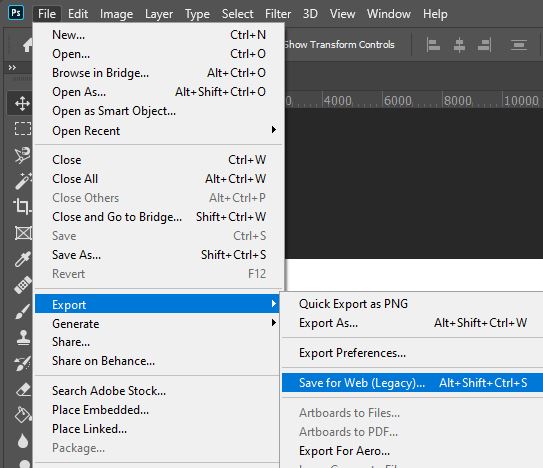
This will open the Save for Web dialog box, where you can specify the compression settings and format of the exported file.
3: Choose a Suitable Export Quality
We can now use the variables within this window to customize the properties of the file that will be exported. We will begin by setting the Export Quality. By decreasing this, we can decrease the image quality of the JPEG which will, in turn, decrease the size of the file.
You can set the Export Quality under the Settings heading in the panel to the right of the window.

I usually find that a quality of around 60 seems to work best in most cases. This is because it drops the file size down to less than a megabyte whilst yielding no noticeable quality reduction. Change the value to something around this number, or to whichever value seems to work most effectively in your situation.
4: In the Same Panel, Change the File Format to JPEG
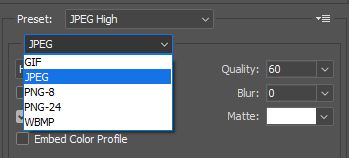
Also under the Settings heading in the right panel is an option to set the File Format. The format selected here will determine the file type that your Photoshop document is exported as.
Since we want to save our file as a JPEG, we will use this dropdown menu to set the file format to JPEG.
5: Click the Save Button and Select the New File’s Name and Location
Once you have set the Export Quality and the File Format, you can then simply go ahead and hit the Save button.
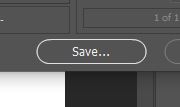
Upon pressing this button, a new window will open entitled ‘Save Optimised As’. Here, set a relevant filename for your JPEG and choose the location that you want to save it in. Make sure you remember where this location is so that you can find your image later.
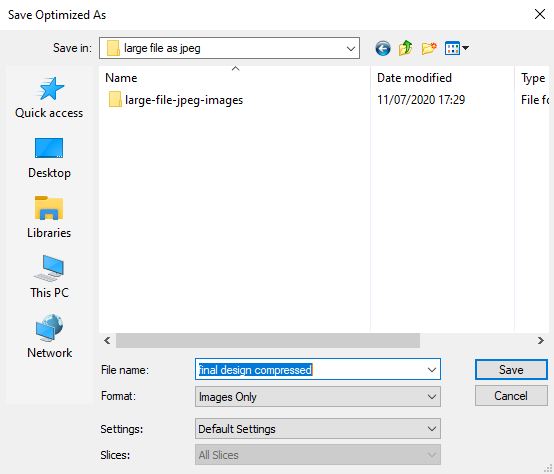
Upon pressing this button, a new window will open entitled ‘Save Optimised As’. Here, set a relevant filename for your JPEG and choose the location that you want to save it in. Make sure you remember where this location is so that you can find your image later.
6: If the File is Still Too Big, Reduce the Image Size Until the JPEG Format is Available
If the file is saved unsuccessfully after completing the last few steps, then it probably means that your file is still too big to be saved as a JPEG. But don’t worry: we still have a few options regarding what to do next.
One great way to further reduce the file size is to reduce the Image Size. This can be done by heading to the bar along the top of the screen and selecting Image > Image Size.
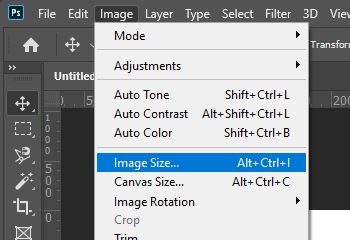
In the dialog box that appears, simply go ahead and decrease the Resolution. Make sure that you don’t make any unnecessarily drastic adjustments to this, as doing so would sacrifice the quality of your final image.
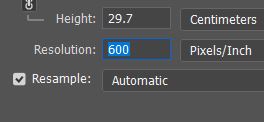
After doing this and applying the adjustment, try saving the file as a JPEG again. If it works, great! If it doesn’t, then just keep decreasing the Resolution until the option to save the file in other formats, such as JPEG, is made available.
7: Also Save the File as a PSD if You Intend to Use it Again Later
Saving your Photoshop file as a JPEG will unfortunately cause you to lose the individual layers that made up your document, since all the layers will be flattened. This means that, unless you also save the PSD file, you will only have a flattened version of the document saved, preventing you from being able to make adjustments to individual layers.
To prevent this, you should always make sure that you save any files that you have worked on in Photoshop as PSD files (or a PSB files for significantly large documents). This will mean that you have both the flattened JPEG form of the document and the layer-preserving PSD form.
So, to save the compression settings of this document, you should consider saving the file as a PSD as well as a JPEG, particularly if you will need to open the file again later to make changes to it. To do this, select File > Save As from the menu bar along the top of the screen, and keep the file format as the default PSD.

That’s about all there is to know about the method you can follow in order to save large Photoshop files as JPEGs! As you can see, the process simply involves a variety of quality and size reduction techniques.
BONUS
Want to find out more about how you can save large files as JPEGs in Photoshop? Then take a look at this video by Ashley Cameron, which demonstrates how you can batch-save large Photoshop files as JPEGs using Adobe Bridge!
Hey, I'm a Professional Retoucher making $10k a month thanks to Photoshop.Register to my newsletter to get freelancing tips and a FREE Brush Pack in Bonus! My Newsletter

