
If you’ve ever taken photographs of a subject in action, then you will undoubtedly understand how annoying it can be when you look back at the photos that you had thought would be action-packed and exciting, but they have turned out to be boring and somehow uncomfortably still. It can seem as though the action hasn’t been effectively captured in the shot.
But there’s no need to fear! Within just a few minutes, you will be able to find yourself with a photo that has been injected with liveliness and excitement thanks to Photoshop’s Radial Blur effect and a few other handy tricks.
This non-destructive and editable effect is a great way to add a punch to your images. Here is an outline of the method that we will be following to add a Radial Blur Action Effect:
Table of Contents
- 1: Go to File > Open to Open Your Image
- 2: Convert the Background Layer into a Smart Object
- 3: Head to Filter > Blur > Radial Blur to Apply the Radial Blur Filter and Edit its Settings
- 4: Re-Open the Radial Blur Effect Panel and Make Any Necessary Changes to the Effect
- 5: Select the Filter’s Layer Mask in the Layers Window
- 6: Select the Gradient Tool from the Toolbar Down the Left Side of Your Screen
- 7: Choose the Radial Gradient Option from the Top of the Screen
- 8: Select the Black-White Gradient in the Options Bar
- 9: Drag Out a Gradient from the Subject to the Edge of the Image
- 10: Adjust the Opacity of the Filter if the Effect is Too Intense
There is a video at the end of this article explaining everything step by step, click here to jump directly to it.
1: Go to File > Open to Open Your Image
As always, let’s begin by opening up Photoshop and heading straight towards the top left corner of your screen to select File > Open.

Doing so will open a dialog box in which you can choose the image that you want to apply the effect to. For this tutorial, we’re using a photo by Jan Kopřiva from Pexels. Once you have located the right image, select it, and choose Open.

You should then see that your image has been successfully opened in Photoshop.
2: Convert the Background Layer into a Smart Object
When you open an image in Photoshop, the program will automatically set the image as a background layer. However, for this process, we will need to change the image from a regular layer to a smart object. This will give us more capabilities and will allow us to make the effect editable and non-destructive.
To convert the layer to a smart object, head over to the Layers Window in the bottom right corner of your screen.

Then simply right-click on the layer entitled ‘Background’ and select the Convert to Smart Object option from the list that pops up as a result.

Once you have clicked this option, there won’t be any visible changes to the layer itself, but if you look at its thumbnail in the Layers Window, you should notice that the smart object icon has appeared at the bottom right corner, indicating the new state of the layer.

After clicking on this version of the file, you should notice that it opens up. The version that opens will be a slightly older version of the file, reflecting how your Photoshop document appeared and what its properties were on that particular restore date.
Of course, if your file is a version from a date further back in the document’s history, you will have to redo a lot of the edits that you have made to the file since its restore date. But, if your file is a more recent version, you will be lucky enough to not have to redo as much of the work, only having to re-apply the most recent edits.
3: Head to Filter > Blur > Radial Blur to Apply the Radial Blur Filter and Edit its Settings
Now that we have converted the image layer into a smart object, we are ready to start making the edits to it. The filter that acts as the backbone of this effect is the Radial Blur Filter, which we will apply first.
To do this, head along the top of the screen to Filter > Blur > Radial Blur.

Doing so will open a dialog box in which you can set the properties of the effect. Let’s first draw our attention to the left side of the box, where we can edit the Blur Method and the Quality. Set the Blur Method to Zoom and the Quality to Best using the dropdown menus next to the respective titles.

At the top of the box, to the left, you should notice that there is an option that allows you to control the amount of blur that is present within the effect. There is no preview box for this, meaning that you won’t be able to see the appearance of the effect until you have actually applied it. But don’t worry- we can always go back into the panel and edit the properties until we’re happy with the effect.
So, using the slider, edit the Blur Amount to control the extent of the effect. There is no way of knowing which value will yield the best effect in your case, but something around 50 tends to work well as a starting point

Next, let’s take a look at the box on the right side of the window. This option allows you to set the point from which you would like your effect to originate. In this Blur Center Box, then, you can essentially move around an anchor point to change the positioning of the radial blur.
The point will, by default, be located at the centre of the box, but if you want your effect to be off-centred then you can simply go ahead and click on the point, dragging it across the box and releasing your mouse once you’re happy with its new position.

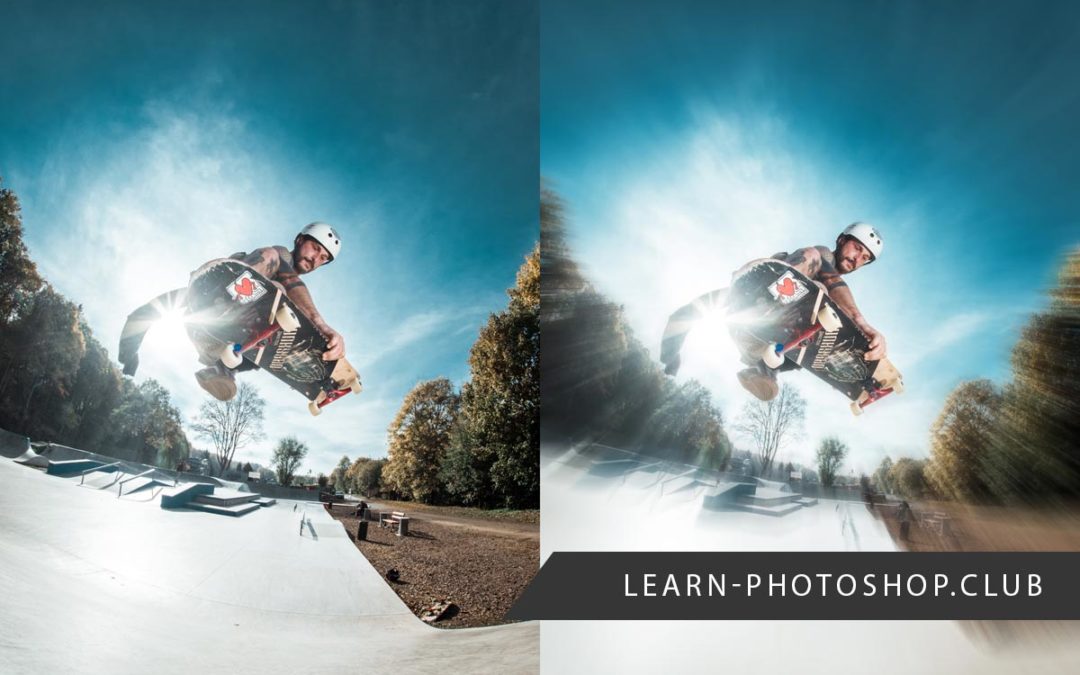
Again, there is, unfortunately, no preview available for this effect, so placing the point of origin is a matter of guessing. For instance, in our case, we want the radial blur to come from the subject- the jumping skateboarder. So, we moved our point slightly upwards and to the left- to a position where it would somewhat correspond with the position of the subject.

Once you are satisfied with the initial properties you have set, simply click OK to close the window and wait for the filter to be applied. Here is what our initial effect looks like:

4: Re-Open the Radial Blur Effect Panel and Make Any Necessary Changes to the Effect
At this stage, you might already be happy with the effect that you have created. However, if you’re unsatisfied with any of the filter’s properties (such as the blur amount or the blur center) then you might want to head back into the effect panel and make some alterations to the settings.
Luckily, since we began by converting our image layer into a smart object, the filter that we applied to the image has been automatically set as a smart filter. This means that we can keep re-editing the effect until we are happy with how it looks!
So, how can this be done? To open the filter control panel again, simply go to the Layers Window at the bottom right of the screen and double-click on the filter’s title- Radial Blur.

With the control window now open, you can make any changes you want! For us, we found that the position of the blur center was slightly off, so we repositioned it by simply clicking and dragging it to a new place within the box. When you’ve made the necessary changes, just click OK to close the window.
Photoshop will apply the filter again, making changes according to the properties that you set. If you are still unhappy with the effect, then simply keep repeating this step until you’re satisfied.
5: Select the Filter’s Layer Mask in the Layers Window
So, now that we have applied the radial blur effect and we are happy with how it looks, we can now move on to making the effect look more realistic. Whilst, currently, there is certainly action in the image, it’s now pretty much just a clumsily blurry photo.
To bring some clarity back into the image, we can use a layer mask to make sure the blur effect is only visible in some areas of the photo. In this case, we’re going to want the focus to be on the subject of the image, so we can use a layer mask to hide the effect in the area of the image that the subject occupies.
Let’s begin this part of the process by selecting the filter’s built-in layer mask to make it active, allowing us to make edits to it. To do this, simply click on the white mask thumbnail above the Radial Blur title in the Layers Window.

You should notice that a white border appears around the mask’s thumbnail. This indicates that it is active and that therefore any changes that you make will be applied to it.
6: Select the Gradient Tool from the Toolbar Down the Left Side of Your Screen
Since we want to make the effect invisible near the subject at the centre of the radial blur, we can use a radial gradient to make the centre of the effect invisible and make a gradual transition into the areas where the filter will be visible.
To do so, we can use the Gradient Tool, which can be selected from the toolbar down the left of the screen by clicking on the icon resembling the one shown below.

7: Choose the Radial Gradient Option from the Top of the Screen
With the Gradient Tool selected, we can now choose the style of gradient that we want to create. In this case, this will be the Radial Gradient. This style can be selected from the options bar near the top of the screen by clicking on the icon shown below.

8: Select the Black-White Gradient in the Options Bar
When working with layer masks, it’s important to remember the basic principles. Layer masks can be used to control the visibility of the layer in certain areas by using white, black, and gray shades ranging between the two extremes to paint over specific areas.
Black areas on a layer mask indicate areas of a corresponding layer that are invisible, whilst white areas correspond to areas of a layer that are entirely visible. Gray tones represent areas that have an opacity value between 0-100% but aren’t fully visible or invisible. The darker the tone on the mask, the less visible the corresponding area of the layer is.
So, since we are using the Gradient Tool on a layer mask, we will need to be working with blacks and whites and the tones in between. Therefore, you will now have to set the colors of the gradient to black and white.
To do so, click on the dropdown menu in the Options Bar near the top of the screen, and choose the Black-White gradient option from the selection that comes up.

9: Drag Out a Gradient from the Subject to the Edge of the Image
With the Gradient Tool now all set up, we can go ahead and create the gradient on the layer mask! Make sure that the Radial Blur Filter’s layer mask is still active and highlighted in the Layers Window before you click anywhere within the document.

When you are ready, click on the subject, or the point at which your blur effect originates, then drag the mouse outwards to any outer edge and release it.

You should now hopefully have created a layer mask that makes the effects of the filter invisible over the subject then provides a gradual transition into full visibility at the outer edges of the image!

10: Adjust the Opacity of the Filter if the Effect is Too Intense
If you are satisfied with how the effect looks at this point, then you’re all done! However, if you think that the effect is a little too intense, then you can tone it down slightly by adjusting the opacity of the filter.
To do this, go ahead and double-click on the filter’s Blending Options icon in the Layers Window. The icon shows a pattern of horizontal lines and triangles and is located to the right of the filter’s name.
Double-clicking on it will open a dialog box in which you can edit the blending settings of the filter. You can use the Opacity slider at the top left of the window to edit the intensity of the effect, with a lower opacity value reducing the intensity.

Usually a value of around 60% works well, but feel free to choose a different value that better suits you. Be sure to keep an eye on the effect’s appearance in the preview window within the dialog box, and click OK when you’re happy with the intensity.

And that is about all there is to know about how to create an exciting radial blur effect in Photoshop! Hopefully, you are now aware of how you can add action to your images, and you have successfully applied an awesome effect to one of your images.
BONUS
Want to find out more about how to create this effect? Then take a look at this video by Stefan Bendik which quickly walks you through a similar technique.
Hey, I'm a Professional Retoucher making $10k a month thanks to Photoshop.Register to my newsletter to get freelancing tips and a FREE Brush Pack in Bonus! My Newsletter

