
Although Photoshop is not primarily a vector editor, it does allow you to open SVG files. The versions from 2015 onwards support the vector-based file type and offer options to either preserve the vector paths or rasterize the file.
Note, however, that Photoshop is not highly suited towards editing vector-based graphics. If you want access to a wider range of capabilities, and if you want to make more specific edits to your vector files, then you should consider opening the SVG file in Adobe Illustrator.
In short, you can open the file as a rasterized image by heading to File > Open then selecting the SVG document, before adjusting the Resolution in the window that opens up. To open the SVG file whilst maintaining its state as a vector object, open it by choosing File > Place Embedded or File > Place Linked.
In this article, we will discuss the above methods in more detail by walking you through the following steps:
Open the SVG as a Rasterised Layer
First, we’ll explore how you can open your SVG document in Photoshop as a single rasterized layer. This means that the vector contents will be converted into bitmap graphics (making any vector objects uneditable and merging the components into a single layer).
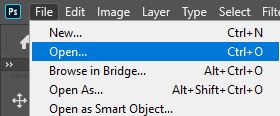
1: Select File > Open and Click on the SVG File
To begin with, let’s head along the top of the screen and select File > Open.
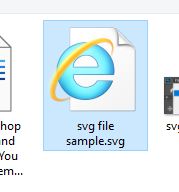
Doing so will cause a new window to open in which you can select a document to open in Photoshop. Once you have located your SVG file, you can open it by double-clicking on its thumbnail.
2: Set the Document’s Properties in the Rasterise SVG Format Window
When you specify a file of the SVG format to be opened in Photoshop, the program automatically brings up a new window called the Rasterise SVG Format Window. Here, you can set the properties of the document, such as the dimensions and the resolution.
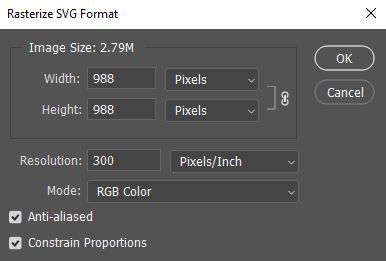
Within this window, you’ll notice options to edit the Width and Height of the file. We’d recommend that you leave these values as they are, as editing them will alter the dimensions of the image, causing the contents of the file to be distorted.
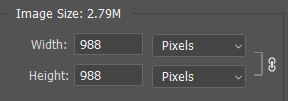
Beneath these boxes is an option to set the Resolution of the document. Here, type in the number that corresponds to the resolution you want. A higher value will result in a higher quality and a greater file size.

If you are in doubt, a value of around 300 pixels per inch tends to work well.
Once you are happy with the settings in this dialog box, you can go ahead and hit the OK button to confirm the edits and open the file.

And you should notice that the contents of the SVG file now appear in Photoshop! Since the contents have been rasterised, you can no longer edit their vector properties, and any edits you make to the layer will affect the quality of the objects on it.
In addition, any separate layers that may have existed in the original SVG file will have been merged into one.
However, you can still make general edits to the document, such as color adjustments and adding text or other layers. For a more extensive list of edits that you can make to Photoshop files, take a look at our complete guide to Photoshop for beginners, which explains how you can use the program’s many functions to make awesome edits to your images!
Open the SVG File as a Vector-Based Document
Next, let’s take a look at how you can open the SVG file without having to rasterise the contents. This method will preserve the vector paths within the document, meaning that the components remain fully editable in their vector forms.
1: Choose File > Place Embedded or Place Linked from the Menu Bar
To start, simply head over to the Menu Bar at the top of the screen and click on File > Place Embedded.
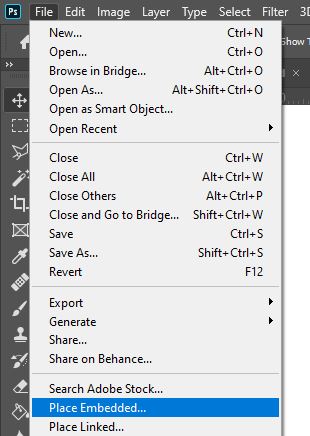
Alternatively, you can select File > Place Linked, which will yield the same result.
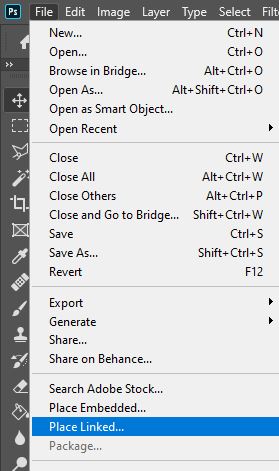
Clicking on these headings will cause a window to open, where you’ll be prompted to select the file you want to open in Photoshop. Locate the SVG file and double-click on it to open it.
And you’ll hopefully see that Photoshop opens the file as a smart object, which is visible in the Layers Window at the bottom right of the screen.
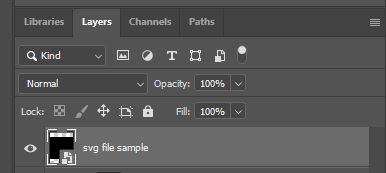
This means that the vector properties of the file remain editable through a process that we will discuss shortly. This method leaves you with a wider range of editing capabilities than the first method we discussed.
2: Edit the Document Within Photoshop
Opening an SVG file in Photoshop gives you access to a whole new range of editing tools which you would not have had access to in vector-based editing programs. Just as if it were a regular image layer, the smart object can be edited in a variety of ways in Photoshop by adding adjustment layers, text layers, and more.
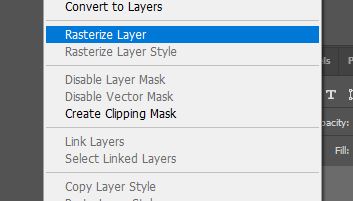
There are some edits for which the smart object will need to be rasterized, such as warping and merging. If you want to make these edits to the layer, you will therefore have to first right-click on the smart object in the Layers Window and select Rasterise Layer. Note that in doing so you will lose the vector properties of the layer’s contents.
For some inspiration regarding what edits you can make to your file, feel free to take a look at this list we have compiled of 50 great Photoshop editing tutorials!
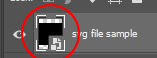
3: Double-Click on the Smart Object to Edit it Within Illustrator
Whilst you can make general edits to the file within Photoshop, if you want to make more specific edits to the vector objects themselves then you can follow a method that opens the smart object in Illustrator, where you can make edits that apply directly to the Photoshop file in real-time.
To do this, simply double-click on the thumbnail of the smart object in the Layers Window.
From the list of programs that appears, select Adobe Illustrator, or any other vector-based editing program of your choice. You will see that the file now opens in the selected program, where you can make edits such as shape adjustments and style changes to the vector objects.
As you make any edits in the external program, the changes will be immediately and automatically applied to the Photoshop file!
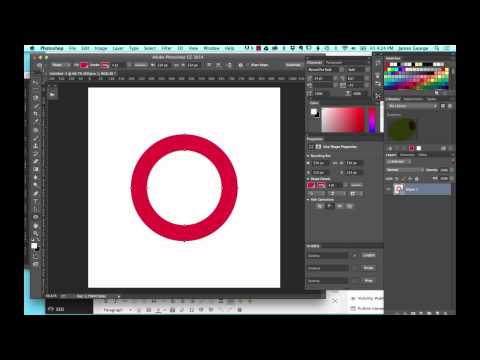
And that’s about all there is to know about how to open and edit SVG files in Photoshop! Want to learn more? Then check out this video by Web Design Blog which walks you through another technique that lets you open an SVG file in Photoshop!
Hey, I'm a Professional Retoucher making $10k a month thanks to Photoshop.Register to my newsletter to get freelancing tips and a FREE Brush Pack in Bonus! My Newsletter

