
Working between Illustrator and Photoshop- two of Adobe’s most popular programs- can be really useful. Due to the differences between the functions that both pieces of software offer, taking advantage of both workspaces is a great way to add a new element of life to your designs.
However, the differences between the programs can also bring some level of difficulty into the process of importing an AI file into Photoshop whilst preserving the original properties of the document.
There are various ways to import AI files into Photoshop, and the easiest methods we will explore provide a range of results- some cause Photoshop to merge the layers of the AI file into one, whilst some preserve the separate layers. In order to keep the Illustrator elements as vectors, the only option is to introduce a third application- Affinity Designer- into the process.
We will explore all these methods in detail, including information on the following:
Table of Contents
So, let’s get started!

What is an AI File?
The filename extension .ai represents the ‘Adobe Illustrator Artwork’ format. The file type was developed for representing vector-based illustrations (which tend to be created in Adobe Illustrator). It supports single-page documents. Due to the elements within the file being vector-based, the content of AI files is versatile and can be used in many different scenarios due to the high quality that is maintained even at high zoom levels.
How Can You Open AI Files?
Now that we’ve learnt more about the nature of AI files, we can jump right into exploring how such files can be opened in Photoshop. For each method, we’ll also explain how you can then proceed to make edits to the file.
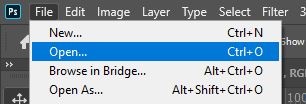
1: Save the AI File and Open it Directly in Photoshop
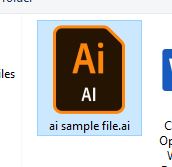
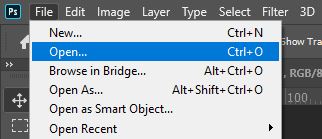
The easiest, and most obvious, method is to simply open the AI file in Photoshop. This can be done by heading along the top of the screen to File > Open.
Doing this will open a window, in which you can select the AI file. Click OK, and you should notice that the file opens as a single rasterized layer.
This means that Photoshop has converted the contents of the Illustrator file from vector elements into rasterized bitmap elements, meaning that you will lose some of the original quality of the contents. It also means that any shape layers are no longer editable.
You will see that if you previously had multiple layers, you now only have one. This is because Photoshop automatically merges the layers into a single one, which also isn’t great as it reduces your editing capabilities.

Therefore, after using this method, there aren’t a lot of edits that you can make to your file in Photoshop. Transforming elements will also cause quality loss as the contents are no longer in vector format. Simple edits like color adjustments should work well, as will plenty of others, but it just means that the editing process will take a lot longer.
So, whilst this method is certainly quick and easy, there are definitely better ways to bring an AI file into Photoshop. Let’s keep exploring more.
2: Export the Illustrator File as a PSD and Open it in Photoshop
A better method to use involves exporting the file as a PSD within Illustrator, then opening the resultant PSD file in Photoshop.
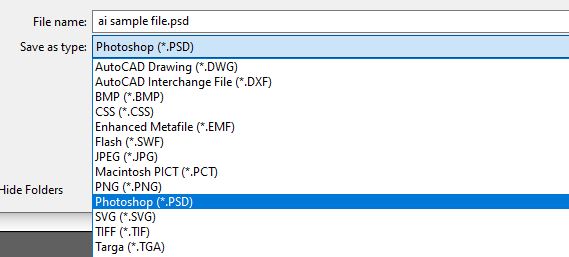
To begin with, open the AI file in Illustrator, then head along the top of the screen to File > Export > Export As.
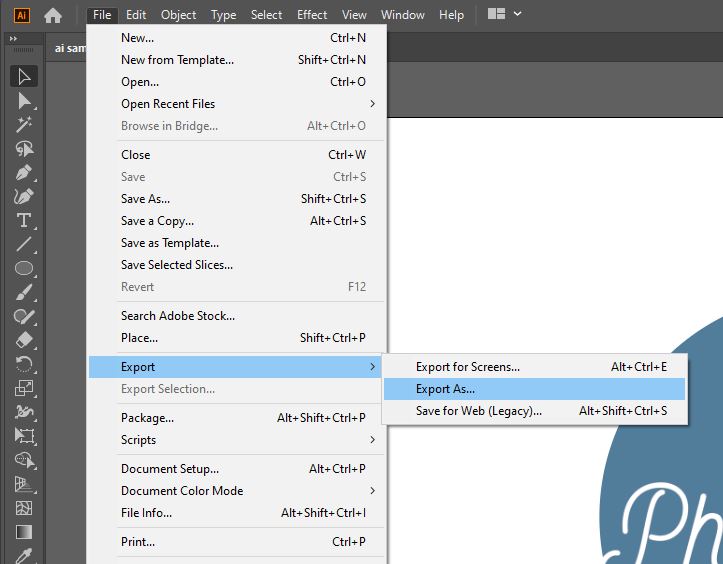
From the file type dropdown menu, select PSD.
Choosing this option will bring up the Photoshop Export Options Window, where you can specify the properties of the Photoshop document that will be created.
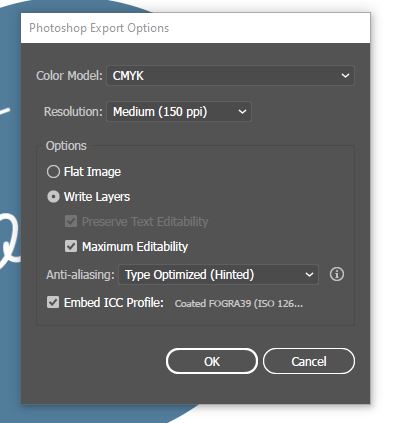
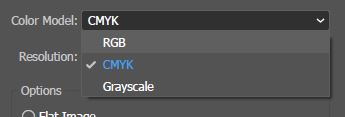
You can use the Color Model menu to select a color mode (in general, you should select RGB for designs that will be displayed on screen, and CMYK for designs intended for printing, such as posters or other physical advertising materials).
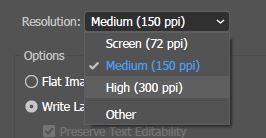
Beneath this is a menu entitled Resolution. A higher value here will result in a higher quality document and a larger file size.
Under the Options heading, there are a variety of settings that can be either ticked or deselected. As shown in the image below, ensure that all the boxes are checked except for Flat Image (unless you would like all your layers to be merged into one).
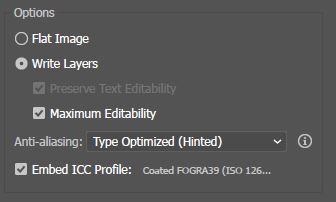
You should be alright to keep the other settings as default, clicking OK when you’re satisfied with the settings.
Then, simply open Photoshop, and head to File > Open to select and open the newly created PSD file.
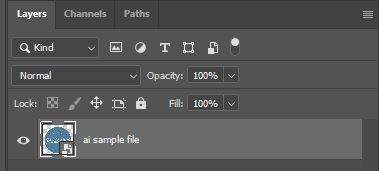
Once it’s been opened, the file should look similar to how it appeared in Illustrator. Using this method means that the separate layers of the file are preserved as separate entities, rather than being automatically merged into one. You can see this in the Layers Window.

The only drawback of this method is that the contents are converted from vectors to bitmap graphics. All shapes are rasterized, but text remains editable unless it is too small to be perceived by Photoshop as text, in which case it will be rasterized and made uneditable as if it were a shape layer.
3: Open the AI File as a Smart Object
So, how can you import an AI file into Photoshop and keep the contents of the document as vector graphics? Well, this technique preserves the format of the contents, yet it does involve making edits to the file in Illustrator which are then applied to the Photoshop file.
To do this, open Photoshop then select File > Open as Smart Object from the bar along the top of the screen.
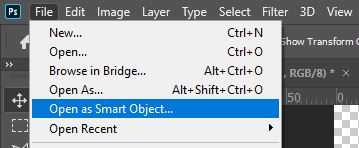
Doing so will open up a window in which you can select the file you want to open. In this case, click on the thumbnail representing the AI file to open it.
Once the file is open, you can double-click on the layer in the Layers Window to make edits to it. Notice, however, that this causes the file to be opened in Adobe Illustrator. As you edit the file in Illustrator, the same edits will be applied to the Photoshop file.
So, this method is also limited, as it doesn’t actually allow you to make majorly specific edits to the layer itself within Photoshop (although you can add adjustment layers, or other layers such as text or images, to the file).
4: Move the File from Illustrator, to Affinity Designer, then to Photoshop
And finally, let’s discuss the method that will let you transfer the file between Illustrator and Photoshop whilst preserving the separate layers and keeping the contents as vectors rather than rasterising them.
The one disadvantage of this technique is that it involves using Affinity Designer, which is a paid program. It can be purchased here, for a starting price of $49.99, with no free trial or unpaid version available.
If you already have the program, or are willing to purchase it, then let’s start exploring how you can involve Affinity Designer in the process of opening AI files in Photoshop!
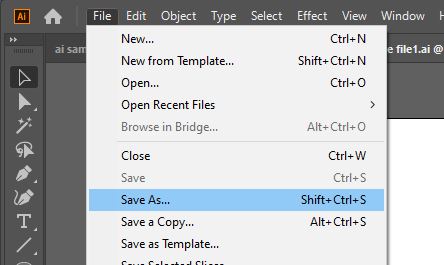
It’s pretty simple. Begin with the AI file open in Adobe Illustrator and select File > Save As from the top menu. Save the file with a relevant name in a location of your choice, then click OK.
After saving this AI file, head into Affinity Designer, and open the newly created document. Once you have opened it, head to File > Export. Then, in the window that opens, select PSD. Doing so will save a PSD file from the AI file that you were working on.
Now that you have saved a PSD file, you can go ahead and open it in Photoshop by selecting
File > Open from the top of the screen.
If you now look in the Layers Window, you’ll see that the separate layers are preserved and that the components of the file are still in vector format rather than bitmap! You can now freely make any edits to the file within Photoshop, with no restrictions introduced by unwanted automatic edits to the document.
And that’s practically everything there is to know about the methods you can use to open AI files in Photoshop! Whilst they each have benefits and disadvantages, hopefully you’ll be able to make a decision on which one works best in your situation and you can get started on enhancing your work with a multi-program approach!
Want to find out more about the techniques discussed in this article? Then check out this video by Marcelo Schultz which demonstrates a few of the methods we walked you through.
Here are some of my favorite Photoshop tools:
Thank you for reading this article. I hope you found it helpful as you’re using Adobe Photoshop. Here are some tools that I use daily while retouching or editing that made my life easier. I hope you’ll also find them as useful as me. These are affiliate links, so if you do decide to purchase any of them, I’ll earn a commission.
But in all honesty, these are the exact tools that I use and recommend to everyone, even my closest friends and family.
Tablet: I remember purchasing my first tablet back in 2011. It was the smallest Wacom available at that time, I think it was an A5 format. Tablets make a huge difference with Photoshop and I can’t work without one nowadays. I recently switched to the amazing Xencelabs Medium Bundle and I just love it.
Quick Fixes: Whenever I need to edit pictures quickly, I use the AI-powered Luminar photo editing tool.
Content Creator Essentials: If you’re taking pictures, video footage, or any other types of media, I recommend you the Samsung T5 external SSD to safely backup and transport your files. Regarding my working station, since I’m always moving from one place to another, I’m using the ASUS ZenBook Pro Duo 15. Its second screen comes in really handy when working on Photoshop.
Hey, I'm a Professional Retoucher making $10k a month thanks to Photoshop.Register to my newsletter to get freelancing tips and a FREE Brush Pack in Bonus! My Newsletter

