
When you work with Photoshop, it is important to know how to reduce your file size. Indeed, depending on what you are using Photoshop to do, your documents can end up getting pretty large. Particularly if you are using memory-heavy commands or working on a very high-resolution document, the size of your Photoshop documents can increase really quickly.
But big documents can end up causing quite a few issues: they take up a lot of space on your computer and can cause Photoshop to crash when they are being opened or worked in. Furthermore, decreasing your file size will improve your efficiency and you’ll be able to collaborate more easily.
Luckily, there are a few different methods you can use to reduce the sizes of your Photoshop files, including deleting or merging layers, cropping the document to the canvas size, making layers invisible before saving the document, and rasterizing smart objects.
In this article, we will explore these methods, and others, in detail, walking you through a process that will hopefully let you gradually reduce the size of your Photoshop file!
Table of Contents
- Change the Image Size in Photoshop
- 10 Tricks to Reduce File Size in Photoshop Without Losing Quality?
- 1: Delete Unnecessary Layers
- 2: Merge Layers Wherever Possible
- 3: Apply Any Layer Masks
- 4: Add a White Layer to the Top of the Document
- 5: Crop the Document to the Canvas Size
- 6: Rasterize Any Smart Objects
- 7: Delete Unnecessary Channels
- 8: Hide All the Layers Before Saving
- 9: Flatten the Document
- 10: Use Adjustment Layers Rather Than Duplicating Layers
- VIDEO TUTORIAL
Change the Image Size in Photoshop
Of course, the most obvious way to reduce the size of your file would be to decrease the resolution of it, given that files of higher quality tend to have much greater size.
You can decrease the resolution of your document by heading along the top of the screen to Image > Image Size.
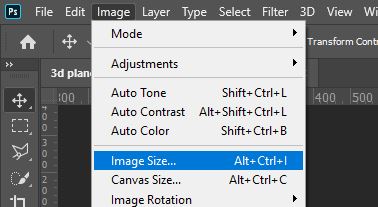
In the box that appears, type in a smaller value for the resolution, then hit the Enter key on your keyboard to confirm the changes.
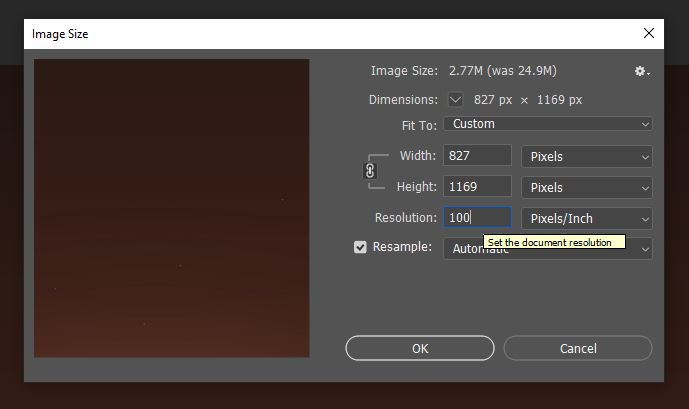
You will probably notice that, depending on the factor by which you reduced the document’s resolution, the quality of the image is perceivably lower. When you save the file, you will see that the size of the final document is also a lot smaller.
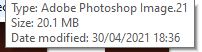
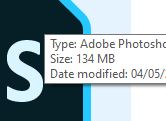
For example, by decreasing the resolution of our Photoshop file from 300 pixels per inch to 100 pixels per inch, the quality of the file remained excellent- there was no noticeable damage to the image- whilst the file size decreased considerably from 134 MB to just 20.1 MB!
Whilst this technique certainly yields a considerable reduction in the size of a file, it is not the most suitable method in most situations. In most cases, you won’t want to sacrifice the quality of your document.
However, if your file is unnecessarily huge, decreasing the resolution of it slightly might not make any noticeable changes to the quality of the image. So, this method of reducing the file size might actually be useful sometimes. Still, if you want to preserve the quality of your document, we’d recommend that you avoid this technique and read on to discover what the alternatives are.
OVERALL REDUCTION: 134 MB –> 20 MB
EFFECT ON FILE: No negative impact on the quality of the file (but there may be a quality reduction in some cases). The integrity of the layers is preserved.
10 Tricks to Reduce File Size in Photoshop Without Losing Quality?
Now that we have looked at one technique that is effective in reducing the size of a Photoshop file but is not so great in terms of preserving image quality let’s look at some other great ways to decrease the size of your files without forcing you to sacrifice the appearance of your designs.
1: Delete Unnecessary Layers
The first and perhaps most logical technique is to delete any layers which aren’t adding any substance to the overall appearance of your document. For instance, you might have some empty layers scattered throughout the document or some layers you have made invisible rather than fully delete them.
Since each new layer adds to the file size, deleting unnecessary ones like these is a handy way to reduce the size of a document without changing its appearance.
So, how can you delete the unwanted layers? Well, you can browse through all the layers in your document within the Layers Window, which is situated by default in the bottom-right corner of the screen.
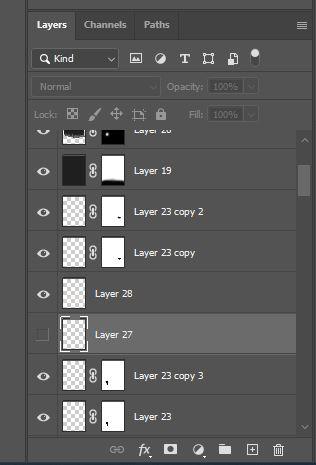
Simply locate the layer which you wish to delete and right-click on it. From the list that comes up, choose Delete Layer.
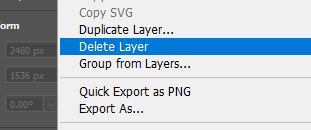
If there are more layers you would like to get rid of, you can repeat the process for each individual layer.
You must think carefully before fully deleting a layer since once you have deleted it, you cannot retrieve it. You should also make sure that you don’t accidentally delete any important layers.
In our case, deleting one unnecessary layer from our Photoshop file let us reduce the file size by 1MB. Whilst this is definitely not the most significant reduction, if you were to delete more layers, you could make a considerably smaller document.
OVERALL REDUCTION: 134 MB –> 133 MB, but the file size could be decreased more significantly if you choose to delete more layers.
EFFECT ON FILE: You, of course, lose some layers, but if these were unnecessary anyway, then this won’t be too big of a deal.
2: Merge Layers Wherever Possible
Another trick you can use to reduce the size of a file involves merging layers. When you merge a layer in Photoshop, you essentially combine the contents of each layer to produce one single layer.
One thing to be aware of when merging layers in Photoshop is that if the layers that are being merged contain overlapping material, the original pixels on the bottom layer will be covered by the new material from the layer merged down on top of it.
Of course, this isn’t an issue if you know that you are satisfied with the composition of your document. But if you want to move elements of your design around later on, take care when merging layers to ensure that you don’t lose pixels or accidentally combine layers that you want to move relative to each other later.
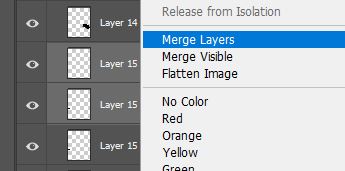
To merge layers, you will need to make sure that the layers you would like to merge are situated on top of each other in the Layers Window.
Once they are in the right location in the layer stack, you can hold down the Shift key on your keyboard whilst clicking on the layers you want to merge to select them.

Then, right click on one of the layers and choose Merge Layers from the list that appears as a result.
After doing this with around 20 layers in our document, we managed to decrease the file size by 4MB. So, this technique doesn’t yield the best results, but its effects might vary depending on the properties of different files.

OVERALL REDUCTION: 134 MB –> 130 MB
EFFECT ON FILE: Usually, the visual impact of merging layers is unnoticeable. However, in some situations, the appearance of your work may change if you are merging layers that have different blend modes, layer masks, or complex layer effects. Merging layers can also damage the integrity of your layers, so be careful when committing to this method.
Related Guides:
Flatten Image vs. Merge Layers: What’s the Difference?
Can You Unmerge Layers in Photoshop? [Yes, Here’s How!]
3: Apply Any Layer Masks
Photoshop’s layer masks let you specify the particular areas of a layer that you want to make visible and which you would like to hide. If you are satisfied with the layer masks within your document and know that you won’t need to edit them later on, you can decrease the file size by applying the layer masks.
Applying a layer mask makes it permanent- it doesn’t change the appearance of the layer. Still, it just combines the layer mask and the layer’s contents into one, permanently hiding the areas of the layer corresponding to the black sections of the layer mask whilst keeping the white areas visible.
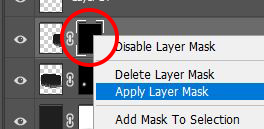
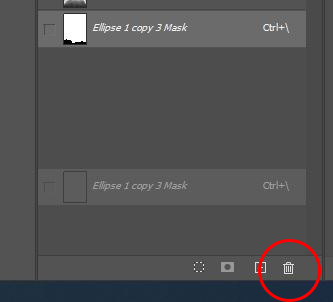
To apply a layer mask in Photoshop, you will again need to work in the Layers Window. All there is to do is right-click on the layer mask’s thumbnail, circled below, before clicking on Apply Layer Mask from the list that comes up as a result.
We applied all the layer masks in our file (around 15 in total) and managed to reduce the file size by around 16 MB. For a method that doesn’t change the appearance of the design at all, this one is quite an effective choice.
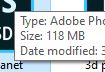
OVERALL REDUCTION: 134 MB –> 118 MB (after applying around 15 layer masks).
EFFECT ON FILE: No visual effect whatsoever, but applying a layer mask means that it is no longer fully editable.
4: Add a White Layer to the Top of the Document
Image previews for Photoshop documents actually increase the size of your files by a significant amount. So, if you add a plain layer at the top of the layer stack to simplify the primary appearance of the file, you can essentially reduce the file size by making the image preview less complex.
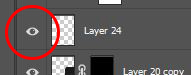
Of course, this won’t make any permanent changes to the appearance of your work- when you open up the PSD file again in Photoshop, you can click on the eye icon next to the top white layer to make it invisible, revealing your original design once again.
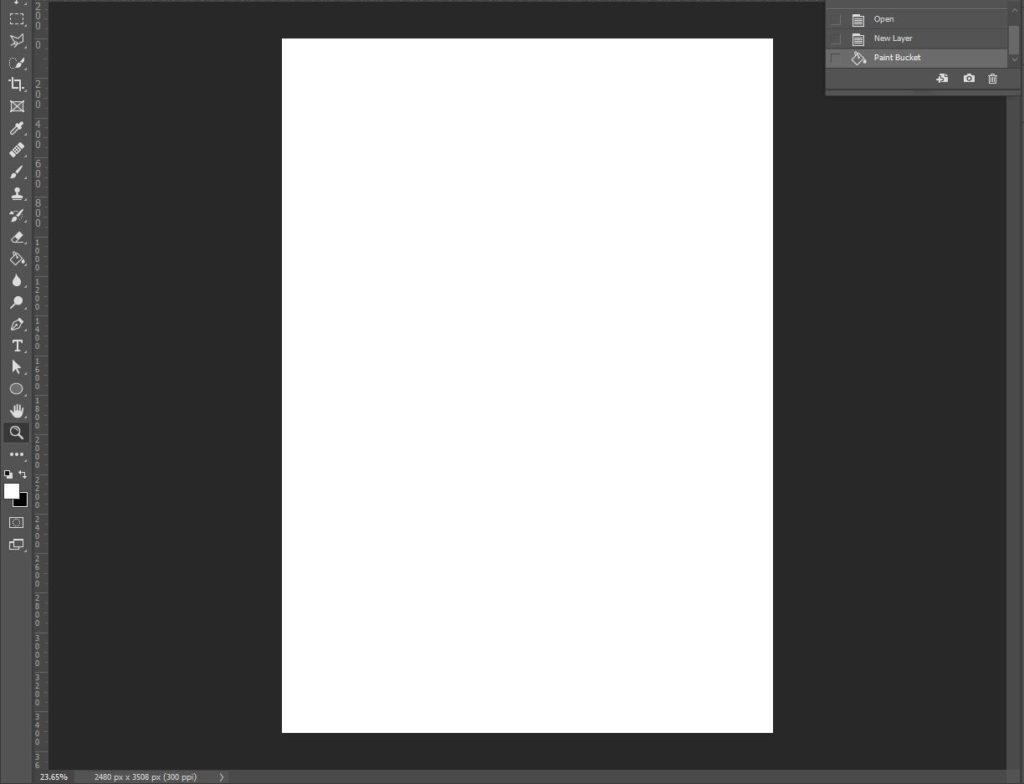
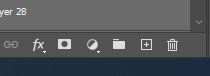
To add a white layer at the top of your document, you will first want to make sure that the current top layer is active since, by default, Photoshop will add any new layers above whichever layer is currently selected. To do this, scroll to the top of the Layers Window and click on the layer at the top of the list.
With the top layer selected, you can go ahead and click on the New Layer icon at the bottom of the window, circled in the image below.

With the new layer created, hit G on your keyboard to select the Paint Bucket Tool. Alternatively, you can make the tool active by clicking on the paint bucket icon in the toolbar down the left side of the screen.

With the Paint Bucket Tool selected, all you need to do now is select the right color, white, to fill the layer with. By default, Photoshop will set the foreground and background colors to black and white, respectively. Since the Paint Bucket Tool fills areas with the foreground color, we need to set the foreground color as white.
The shortcut to set the foreground color to white, no matter what colors are currently selected in your case, is to hit D then X on your keyboard.

Now that you have selected white as the fill color, you can go ahead and fill the layer with white by clicking anywhere on the canvas!
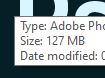
By making the quick change of adding a plain white layer to the top of our document, we managed to decrease the file size by 7MB! Not bad for such a quick fix, right? And in combination with other methods we have discussed, it can really lead to great results!
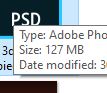
OVERALL REDUCTION: 134 MB –> 127 MB
EFFECT ON FILE: No permanent changes are made to the document. The white layer can be easily hidden or brought back to visibility by clicking on the eye icon next to the layer in the Layers Window.
5: Crop the Document to the Canvas Size
Quite often, when working in Photoshop, we end up increasing the size of layers or moving them to extend beyond the boundaries of the canvas.
Even if they are not located within the canvas itself, any pixels will increase the size of your file. And since areas that lie outside of the canvas are rendered invisible by Photoshop, it is pointless to keep them there while adding unnecessary weight to the file size.
So, to change this, we can crop the document to the dimensions of the canvas, deleting any external pixels. You can achieve this pretty quickly by hitting Ctrl [Win] / Cmd [Mac] + A on your keyboard to select the whole area of the canvas.
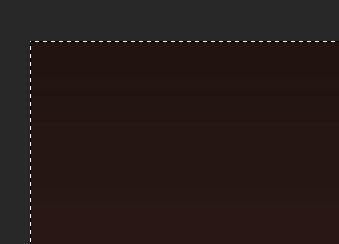
You should notice that a moving white-dotted line appears marking the perimeter of the canvas, indicating that the whole area bounded by the box has been selected.
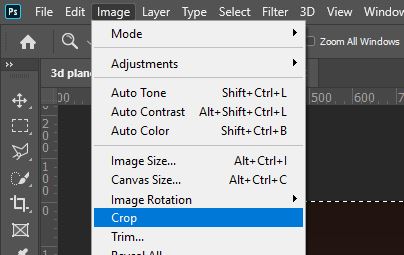
With the entire canvas selected, all you need to do is head to Image > Crop to delete the areas outside the canvas bounds!
For us, this lets us reduce the size of our Photoshop document by a hugely significant level- by almost 54 MB! The result depends on how many elements exist outside the boundaries of your document, so the effectiveness of this method does vary, but it definitely has incredible potential.
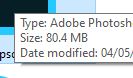
OVERALL REDUCTION: 134 MB –> 80.4 MB
EFFECT ON FILE: This technique doesn’t affect the visible areas of the document but rather removes the pixels which were invisible anyway due to their positions outside the boundaries of the canvas.
6: Rasterize Any Smart Objects
Another thing you can do to decrease the size of a Photoshop file is to rasterize any smart objects. By rasterizing layers, you convert them to bitmap graphics, which is a great way to reduce the amount of information a layer contains and make a document smaller.
So, if you have any smart objects within your document, you can rasterize them by right-clicking on them in the Layers Window and selecting Rasterize Layer from the list that pops up.

In our case, this actually didn’t produce any considerable effect on the file size of the document- it decreased the size by around 0.02 MB. It is because we rasterize layers that were simple ellipse shapes. If you have bigger smart objects (like a high rez image) or a large number of smart objects, the method might be more useful.
Before rasterizing layers, it is important to think about whether you will want to edit the properties of the smart object, text, or shape later. Once you have converted the object into a raster graphic, you can’t alter its unique vector properties again (for instance, the font of a body of text or the curvature of a shape).
Therefore, only rasterize smart objects once you are completely happy with their appearance and their properties.
OVERALL REDUCTION: 134 MB –> 134 MB (after rasterizing five layers). The size reduction could be a lot bigger if you rasterize smart objects like high definition images.
EFFECT ON FILE: No visual effect, but rasterizing layers disables some editing capabilities exclusive to smart objects.
7: Delete Unnecessary Channels
Channels can take up a lot of space, so if they are no longer necessary in your project, it is probably a good idea to delete them.
You can delete channels within the Channels Window, which is typically located at the bottom right of your screen and can be opened by clicking on the Channels title as shown below.
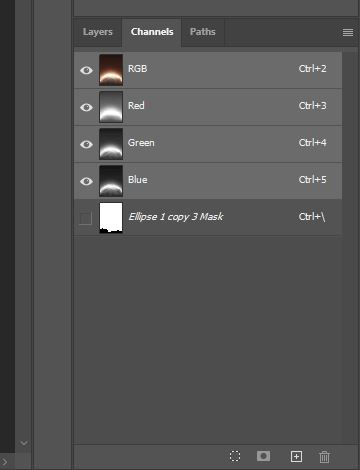
To delete a channel within this window, click on it and hold down your mouse key whilst dragging it to the trash can icon at the bottom of the panel, releasing once the channel is hovering over it.
Like the previous method, this technique wasn’t the most effective, reducing the file size by less than 1 MB. But if you are working with a document containing lots of unnecessary channels, this technique might be highly effective.
OVERALL REDUCTION: 134 MB –> 134 MB (as a result of deleting one channel). This reduction could be more significant if you delete multiple channels.
EFFECT ON FILE: In our case, this method didn’t have any negative visual impact on our file.
8: Hide All the Layers Before Saving
One, perhaps surprising, technique you can use to reduce the size of a Photoshop file involves making all the layers in your document invisible before saving it.
It is important to note here that if you are working with a document where you have to make certain layers invisible and certain layers visible, you should take care to remember which layers were originally invisible. Otherwise, when you come back to the file and make the layers visible again after saving it, you might accidentally make visible a layer that was supposed to be hidden, which could negatively influence the appearance of your work.
To make all the layers of your document invisible, you’ll need to, again, be working in the Layers Window. All you need to do is gradually scroll through all your layers and click on the eye icon to the left of each one to make them all invisible.
Once all the layers are invisible, you should see that all the eye icons next to the layers have disappeared, indicating that the layers have each been hidden.
By following this process, we were able to reduce our file size by around 7 MB. Considering the method doesn’t make any permanent changes to the document, 7 MB is a great reduction!
OVERALL REDUCTION: 134 MB –> 127 MB
EFFECT ON FILE: This technique applies no permanent changes to a file. You can make all the layers visible again upon opening up the document the next time.
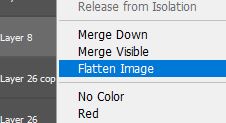
9: Flatten the Document
One method which is incredibly effective in reducing the size of a Photoshop file involves flattening the document. This function is similar to merging layers, except it combines every single layer in the document to create one flat image.
Whilst it won’t change the appearance of the file, this technique is pretty destructive. Once all your layers have been merged into one, it will become considerably more difficult to edit the individual components of the document. For this reason, we would recommend that you think very carefully before flattening a file.
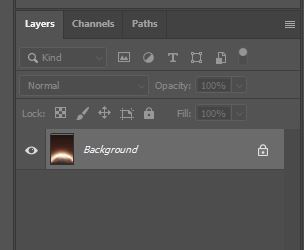
If you are happy to do so, though, you can flatten all the layers of your document into a single layer by right-clicking on any layer within the Layers Window and selecting Flatten Image from the list that appears.
By looking at the Layers Window afterward, you will notice that the document now contains just one layer, which is really beneficial for the file size. Obviously, a file with one layer is a lot smaller than one composed of hundreds of layers.
The impact that is flattening the document has on the size of our file was incredible! We managed to change the file size from 134 MB to just 7.81 MB. The effect will vary depending on how many layers existed in your original document. Still, since we had so many layers in our file, the impact of reducing that amount to just one was really significant.
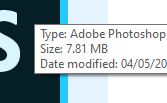
OVERALL REDUCTION: 134 MB –> 7.81 MB
EFFECT ON FILE: Visually, the file appears the same. Yet, merging all the layers of your document into one layer will greatly lessen the range of editing options you have access to since it becomes more difficult to edit the individual components of your file.
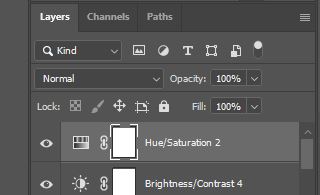
10: Use Adjustment Layers Rather Than Duplicating Layers
Our final tip for reducing the sizes of your Photoshop files is always to use adjustment layers rather than duplicating layers then applying direct adjustments.
When wanting to make light and color adjustments to a layer, many Photoshop users, including professionals, opt to duplicate the layer and apply direct adjustments to the copy via Image > Adjustments. This method causes lots of memory to be taken up, though, since it involves duplicating so many layers and increasing the overall number of layers in your document.
Whilst this is better than applying the edits directly to a non-duplicated layer since it lets you work non-destructively, there is an alternative technique to use which is less detrimental to the file size yet still acts as a non-destructive way of working.
Photoshop’s adjustment layers let you apply the same edits to layers as you can access through the Image > Adjustments menu, yet they act on a separate layer. This means they can be edited, enabled, disabled, or deleted whenever necessary, making them a lot more versatile than direct adjustments.
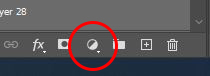
But how can you add an adjustment layer? You can create one really quickly by clicking on the New Adjustment Layer icon at the bottom of the Layers Window, as circled below.
Clicking on this icon will cause a flyout menu to appear where you can specify the type of adjustment you would like to make to your documents, such as Brightness and Contrast, Hue and Saturation, and Color Balance. Click on the one you would like to add, and that’s all there is to it!
Once you’ve added a new adjustment layer, a new window opens where you can edit the properties of the alterations as normal.
VIDEO TUTORIAL
And with that, we have covered pretty much every technique you can use in order to reduce the size of your Photoshop files!
Want to see a visual demonstration of how you can reduce the image size of your document without losing its original high quality? Then check out this video by Signature Edits, which provides an obvious explanation of the process.
Hey, I'm a Professional Retoucher making $10k a month thanks to Photoshop.Register to my newsletter to get freelancing tips and a FREE Brush Pack in Bonus! My Newsletter

