Learn how to export photos for Facebook, Instagram and your website

Arguably one of the most important parts of your creative process is exporting the final creation. No matter how good your work is, or how high the quality, exporting and uploading it in the wrong way can have drastically detrimental impacts on how the piece appears.
Whether you want to use the platforms listed above to share work with your friends and family or clients, posting high-quality images is a vital part of a creator’s marketing process. Sharing images of good quality can make an unbelievably huge difference to your digital portfolio.
So do you want to find out how to optimize the image quality when exporting images for Facebook, Instagram and Your Website from Photoshop? Here are the different subjects we will discuss:
- Saving the Image from Photoshop
- Facebook Best Export Settings
- Sharing from the Facebook Mobile App
- Instagram Best Export Settings
- Best Export Settings for Websites
If you want to have even more details about correctly exporting your images from Photoshop, we recommend you to check these videos available at the end of the article.
Saving the Image from Photoshop
Optimising the resolution of your work is a process that begins even within the Photoshop program. Perhaps the most important stage is in fact initially saving the image as having a large enough size and a high resolution.
However, whilst a large file size is important, a file size that is too large can cause your image to be compressed further, and to ultimately appear to be of a low quality. So our goal in the case of this tutorial is to upload an image with the largest possible image size that each platform supports.
This way you will be able to optimise the quality of your posts, whilst still maintaining a quick loading time and avoiding compression or cropping.
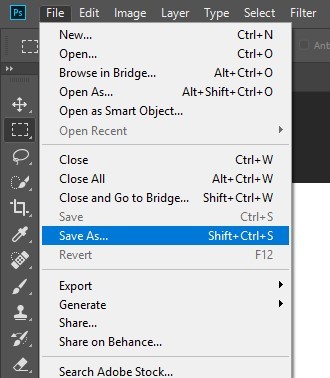
We’ll begin by saving your work directly from Photoshop as a JPEG with an sRGB color profile. If you are unaware of how to save your work, then you can do so by simply heading to File > Save As and changing the file type to JPEG.
It’s important that we save the file as a JPEG image file rather than a PSD (Photoshop Document), as the latter would still be a file that contains all the separate layer information. Saving as a JPEG will automatically save the image as a single layer, since they all merge together temporarily to form a flat image that can be shared online.
Now in terms of the image size that you should save your JPEG as, simply check under the relevant headings below to see what sizes and aspect ratios are supported by each platform.
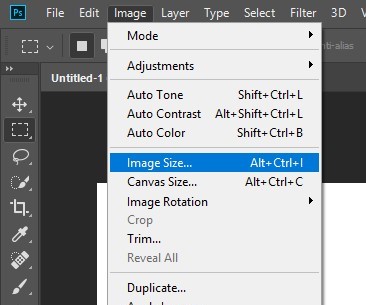
To change the image size, just head along the top bar to Image > Image Size and input the relevant values.
Facebook Best Export Settings
REGULAR PHOTOS 720px, 960px, or 2048px wide
COVER PHOTOS 851px by 315px
SIZE If you're not satisfied with the Facebook compression, try to have a file size under 100KB to minimize its effect.
FILE TYPE JPEG is what works the best and don't forget to save it with an sRGB color profile
As one of the most popular social media sites amongst today’s generation, Facebook can act as a great marketing tool through which to share your work with potential clients. Also acting as an image sharing site, it can be a suitable tool for creating and storing a portfolio of your work.
So how can you use this site to share your posts?
Once you have saved your work from Photoshop as a JPEG, you will be able to upload it to Facebook.
When sharing images on this site, save the image with the following dimensions and quality in order to optimize the final quality of the image that you post.
Note that when sharing a cover photo, the best way to avoid compression is to upload the image with a file size of less than 100kb.
When you upload a photo to Facebook, the site has to compress and resize your image using algorithms in order to ensure that the loading time for viewers of the photo stays as short as possible (and also to save on their server storage). This encourages a positive consumer experience.
Therefore if your file size is too big, in other words, bigger than 100kb, then the image of your work will take a longer time to load, meaning that potential viewers may scroll past before it has loaded. Research has shown that people will wait no longer than just 3 seconds for a photo to load before moving on.
Therefore, the smaller the file size the quicker the image will load for viewers. Because of this it’s important to create a healthy balance between image quality and file size, to make sure that it loads quickly but still appears to be of a high quality.
Sharing from the Facebook Mobile App
When uploading work using the Facebook mobile app, your photo will upload with a low quality automatically. This can be a pain for many users, especially artists and creators, who often wish to share higher quality images.
What is unknown to many users is that the app has a HD setting. This will be turned off by default, but you can easily turn it on to start uploading high-definition images to impress viewers and to optimise the quality of your work.
It’s pretty easy to do this- all you need to do is head to Facebook Mobile Menu > Settings > Account Settings > Videos and Photos. Here, simply move the slider to the right. From now on, you should be able to upload photos of a higher definition!
Instagram Best Export Settings
Primarily advertised as an image sharing platform, Instagram is another great tool for uploading pictures of your work. Whether you’re an artist, photographer, designer or another creator, sharing your pieces on the site can be an effective, and often free, marketing method.
With its fairly new advertising tools, which are offered to business accounts, you can also pay to promote your posts to particular groups of people.
These adverts would then appear as photos of your work on people’s feeds, which are often scrolled through with great speed, meaning that the quality of your posts is key if you want to use the app as a marketing platform and successfully attract viewers without them losing interest.
As a popular site, there are plenty of high-quality images out there. So it’s of high importance to make your work meet or exceed the quality of other posts, allowing your pieces to stand out.
The Instagram Help Centre states that the site makes sure to upload the image with a file size and image quality of as high as possible- up to a maximum width of 1080 pixels. Therefore, if the image that you upload is between a width of 320 and 1080 pixels, Instagram will leave it at its original resolution, as long as the photo’s aspect ratio is between 1.91:1 and 4:5.
Requirements:
Minimum 1080px wide
Aspect ratio is between 1.91:1 and 4:5
If the aspect ratio of your image is not supported, then the app will crop it to fit supported dimensions. Likewise, if your photo is more than 1080px wide then Instagram will reduce the resolution to 1080px. The same applies for smaller images- for photos that are less than 320px wide the site will increase the resolution to 320 pixels.
Therefore, if you want your post to be of the highest quality possible, then all you need to do is upload a photo with a width of at least 1080 pixels, ensuring that it is of a supported aspect ratio to avoid automatic cropping.
| Aspect Ratio | Type of Instagram Post | Post Size in pixels |
|---|---|---|
| 1:1 | Square | 1080 x 1080px |
| 1,91:1 | Landscape | 1080 x 608px |
| 4:5 | Portrait | 1080 x 1350px |
| 9:16 | Stories | 1080 x 1920px |
| 1:1,55 | IGTV Cover Photo | 420 x 654px |
| 1:1 | Square Video | 1080 x 1080px |
| 1,91:1 | Lanscape Video | 1080 x 608px |
| 4:5 | Portrait Video | 1080 x 1350px |
Best Export Settings for Websites
Of all the sites discussed so far, your own website is arguably the most important. For many creators, personal websites are the tool through which they must present themselves- the sharing of high-quality images is the key to success in this area.
Images of a high resolution become even more vital when it comes to your online store, which may be situated on your website. If you are selling digital artwork, it is extremely important to upload pictures of high quality, which reflect the detail in your work and present it as it would appear after having been purchased.
When uploading images for your online portfolio, there is something that is, in fact, even more important than the quality of the pictures. This comes in the form of the application of Search Engine Optimisation (SEO) guidelines.
Good use of SEO will see your website ranked higher amongst others, meaning that more potential clients will click on your website when searching for the relevant type of creator.
Search engines such as Google and Bing rank and index your site against other similar ones. So to put it simply, the better your SEO, the higher up in the search results you will appear.
One way to improve your ranking, determined by SEO, is to upload your images with descriptive and highly detailed names, which should include keywords.
When doing this, it is important to ask questions to yourself about what kind of keywords would help to attract clients. What would potential clients search for? How can those words apply to my images? Are the keywords relevant to the work that is pictured?
The keywords that you include will be the ones that make it possible for people to find your site via search engines. For instance, if someone was to search ‘photographer’, people who have tagged their images with the keyword ‘photographer’ would come up somewhere within the search results.
So, let’s say you are uploading an image of a portrait that you have retouched. To encourage it to appear on search engines, you could title the file retouching_professional_service_portrait, or something similar. It’s also a good idea to add on the name of where you are located and where you will be carrying out your service to attract local customers.
The more keywords that you add, the more likely your image will be to appear when potential clients search for a service or for pieces of work to purchase. That being said, don’t go too crazy with it- only include relevant keywords.
Now in terms of exporting the image itself from Photoshop, we will discuss the appropriate settings to use when saving a photo for use on a website.
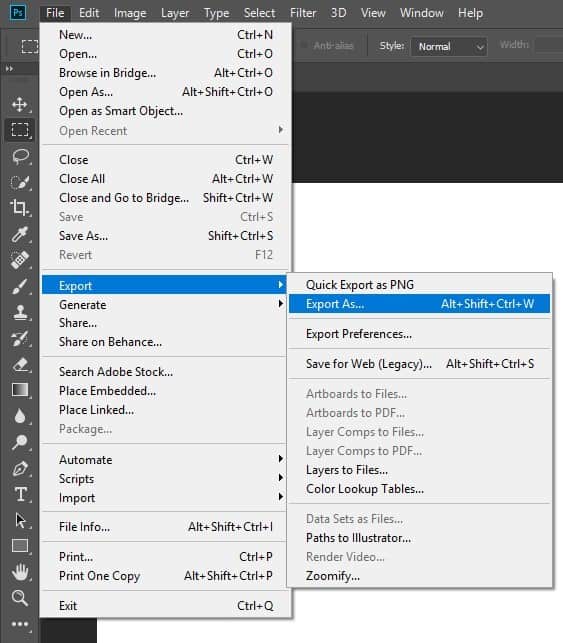
Let’s export this piece using the Export As option. To use this, we’ll head to File > Export > Quick Export As.
The priority here is to export a smaller sized JPEG, whilst also preserving the resolution of your work. You may want to follow the settings below, or use similar settings that you think are suitable for your website or for the individual piece of work.
Format: JPEG (see the start of the article for details on how to save a file as a JPEG rather than the default PSD)
Quality: Set this to around 70%. Anything below 60% will cause quality reduction to become visible, perhaps having an obvious detrimental impact on the appearance of your image.
Optimized: Check the box next to this option. It should appear opposite the Quality and Blur drop-down menus, but if it doesn’t appear, then don’t worry about selecting it.
Convert to sRGB: Check this option, as this determines the color mode of your image. This tends to be selected by default, but it’s always a good idea to double-check.
Image Size: 2048 pixels should be the length of the longest edge of your image. Allow the other side length to automatically respond to this, meaning that the aspect ratio will stay the same as it was originally.
Width and height are locked together by default, luckily. So when you change one value, it will change the other proportionately. If you wish to change this, and instead alter the values independently, losing the original proportions of your image, simply click on the lock icon to unlock the two variables.
Underneath the heading Metadata, select the option that allows you to keep your Copyright and Contact Info as part of the file’s information. This is a great option for uploading your work to a website.
Once that you have inputted the settings above, your photo should be suitable to upload to and use on your website!
And there you have it! You should now have learned more about what image size, resolution, dimensions or processes should be adopted when exporting photos for Facebook, Instagram or your website from Photoshop.
For more information on the topic discussed in this article, feel free to check out the following videos, which will hopefully provide you with further advice on how to export your work from Photoshop for posting on photo-sharing platforms.
BONUS
This video by Miguel Quiles on exporting images for Instagram and Facebook.
Or this video by Howfinity on exporting images for your website.
Hey, I'm a Professional Retoucher making $10k a month thanks to Photoshop.Register to my newsletter to get freelancing tips and a FREE Brush Pack in Bonus! My Newsletter


