
How to Whiten Teeth Using Photoshop

Image copyright Tanzima Noor Tazin via Flickr
To find great stock images, check our 25 best stock images website here.
Cosmetic dentistry and computers don’t necessarily go hand in hand, but Photoshop brings some serious facelift firepower to the table. A quick image search on the internet will reveal that unwhitened teeth are incredibly hard to come by. Whether or not that says something about the people on the web, it’s easy to say that teeth whitening is one of the most common image edits around.
I’ve found a photograph where the subject could use some teeth whitening. To do so, we will be using the Hue and Saturation and the Brightness and Contrast tools. While this tutorial is made using Photoshop CC 2019, the steps should cover older versions of Photoshop as well. So let’s get started.
Before we begin, you should already have your image opened in Photoshop. If you would like to know how that’s done, click here.
Method 1: Simple Teeth Whitening
Step 1: Duplicate the background layer
We cannot edit directly onto the background layer in Photoshop. Therefore we must duplicate it.

Go to the Layers Pane on the bottom right of the screen.
Click and drag the layer Background to the New Layer icon.
This will create a copy of the Background layer. We can now begin working on this layer.


Step 2: Making the selection
Zoom into the image around the teeth portion. This can be done by holding down Alt [Win] or Option [Mac] and scrolling up or down on your mouse.

We now need to make a selection around the teeth. This ensures that all the changes we make afterwards affect only what we have selected, and not the rest of the image.
To do this, go to the Toolbar on the left of the screen, and select the Magnetic Lasso tool

Now, click once on any one corner of the mouth, and begin to trace the outline of the teeth with your mouse cursor. As you do this, the tool will automatically draw a path along the edges.
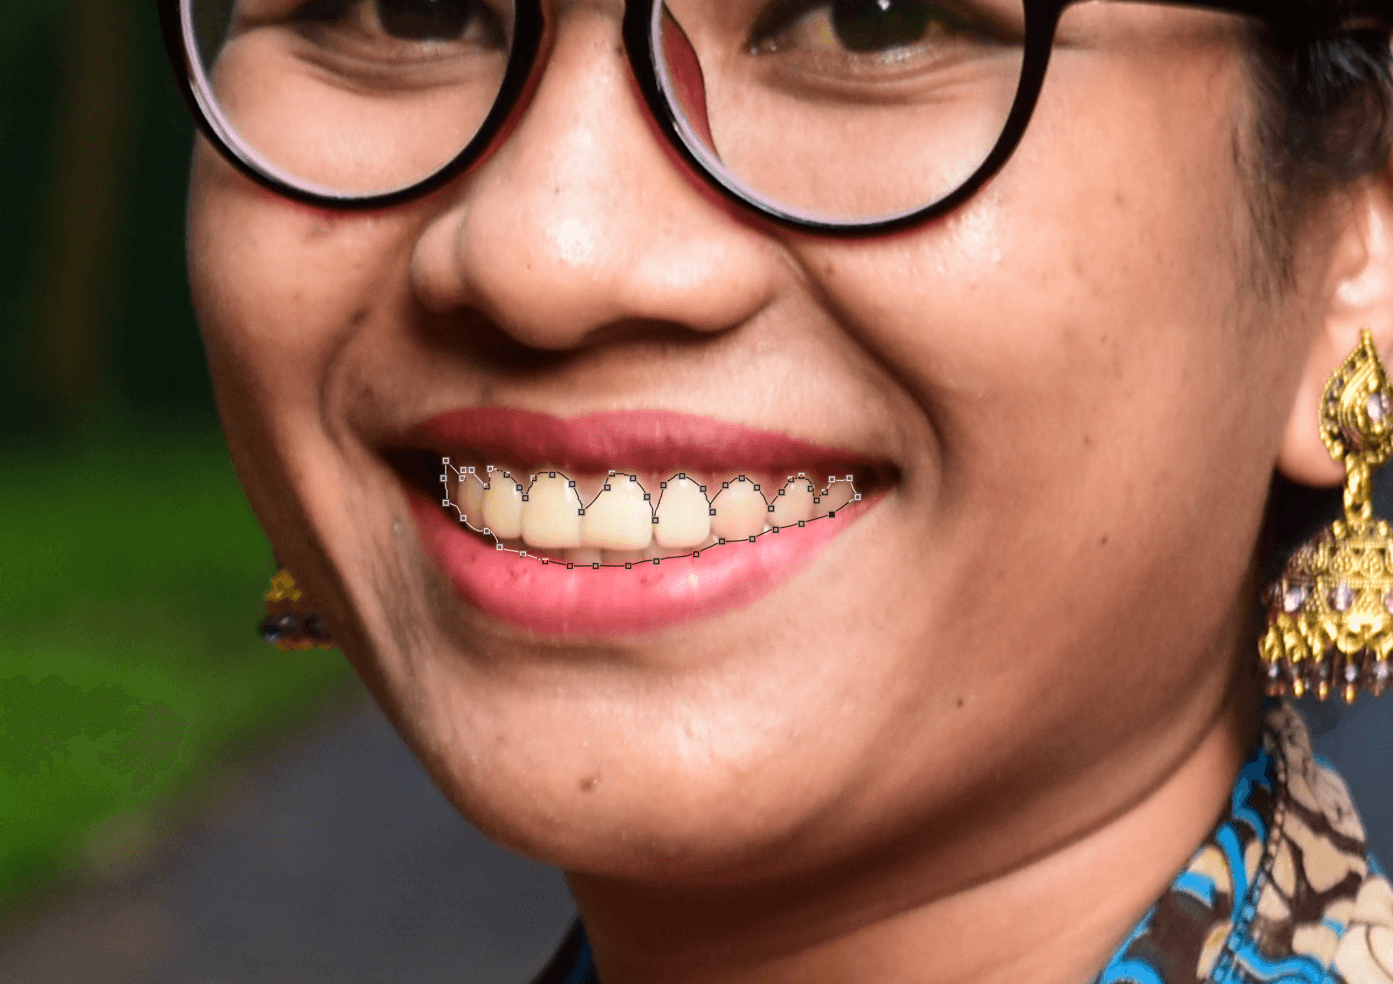
If the tool begins to lose the outline, simply click once to manually add a point.
Click your mouse when you reach the end of the trace to finalize the selection. It should now look like this.

Step 3: Refining the selection
Now we have our teeth selected within the image. However, we can’t begin editing just yet. The selection around the teeth is still quite rough and unnatural. For a more finished and professional look, we need to clean up the outline of the selection.
To do this, we use the Refine Edge tool. It is a legacy Photoshop tool.
If you are using an older version of Photoshop, in the menu bar click Select > Refine Edge. However, if you are using Photoshop CC 2019, hold down the Shift key and go to Select > Select and Mask in the menu bar.

This will open the Refine Edge tool.

We can easily see our selection now that the entire image is in red. It is also possible to see how sharp and unnatural the edges of the selection are. We will now clean this up.
In Refine Edge tool window, check the Smart Radius option, and drag the Radius slider up until the selection begins to look more natural.
Once this is done, use the Smooth, Feather, and Contrast sliders in the Adjust Edge section to clean up the edges. Finally, reduce the Shift Edge value by a small amount to ensure the selection stays within the outline.
The exact values are subjective and depend greatly on the image and the selection. Feel free to play around with the settings until your selection is natural and to your liking. My settings are shown below

Make sure Output To: Selection is selected. At this point, the selection preview should look smoother and more natural.

Click on OK to accept the selection. It should now look like this.

We can now move on to our corrections.
Step 4: Whitening the teeth
We will now begin whitening the teeth.
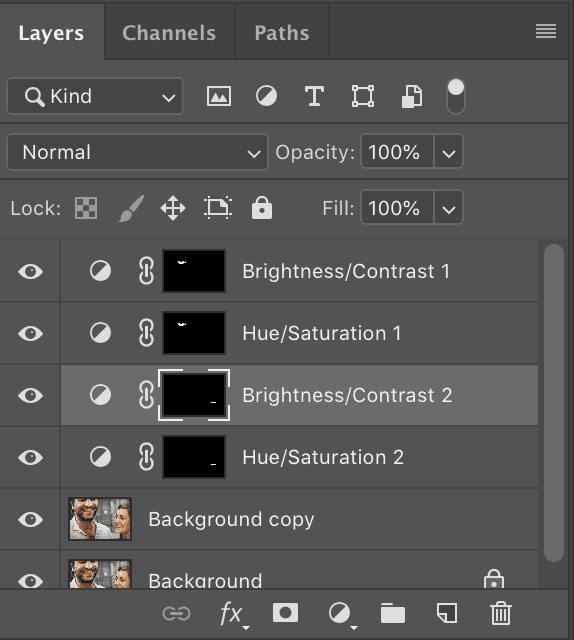
Go to the Adjustments Pane on the right side above the Layers Pane.

Click on the Hue/Saturation tool.
A new Adjustment Layer will be created.

The following menu will pop up above the Layers Pane.

In the drop down box that says “Master”, click and select the Yellows channel. This will ensure that we only affect the yellow tones in the image.

Increase the brightness of the teeth by dragging the Lightness slider to the right. This is subjective and must be done visually.

As you can see, the teeth are now brighter, but still having a significant amount of coloration in them. Naturally white teeth do not present any significant color, so we will decrease the saturation of the teeth in the image.
To do this, drag the Saturation slider to the left. This is subjective and must be done visually.

The image is now really beginning to take shape. However, the teeth still look a little pale.
To fix it, we need to create a new Adjustment Layer.
To do this, first press Ctrl [Win] or Cmd [Mac] and click on the original layer mask to reselect the teeth. This step needs to be done with every new Adjustment Layer.
Now, go to the Adjustment Layer Pane and select the Brightness/ Contrast tool.
This brings up the following window:

Before making any changes, check that a new Adjustment Layer has indeed been created with the correct layer mask. This is to avoid any errors further into the process.

Once you have verified that a new layer has been created, proceed with the edit.
In the Brightness/Contrast window, increase the contrast by dragging the Contrast slider to the right. This is subjective and must be done visually.
You will notice that as you do this, the image also gets brighter. Since we already set the brightness in the previous step, we do not want any changes here. So, counteract this by moving the Brightness slider to the left. You will have to visually gauge how much brightness to reduce.

The image is nearly done. It’s looking pretty good at this stage, and you could publish it if you like, but I’d like to go one extra step to make sure that no part of it looks touched up.
It’s this added layer of realism that can set apart good quality photoshop work.
Step 5: Final touch up
We will now be performing some manual corrections to the image by darkening any unnaturally white areas in the image. First, save your work by pressing Ctrl + S [Win] or Cmd + S [Mac].
Now, go ahead and select the original Background copy layer in the Layers Pane.
Then, Ctrl + Click [Win] or Cmd + Click [Mac] on the Layer Mask to select the teeth.
Now, go to the toolbar and select the Burn tool.
The Burn tool decreases the brightness of a portion of the image by “burning” it. This term comes from old darkroom techniques. As you select this tool, the following menu will show up on top of your workspace.

Set your Range to Midtones and your Exposure to 18%. This will ensure a natural and even look.
Now we will need to paint onto the image. To do this, use [ or ] keys to increase or decrease the brush size.
Once you have an appropriate size, use the Burn tool to darken the ridges between the teeth, as well as the gums. In my image, I even went around to the bottom teeth as they were too bright to be naturally visible.
Take your time and work carefully in this stage. Do what looks good to you.
You can check your progress by pressing the Alt [Win] or Option [Mac] and clicking on the Layer Reveal icon on the Background Layer. This will toggle all the layers above it, allowing you to quickly see a Before/After view of your work.

Once you’re done, you should have a complete and realistic image!

Method 2: Whitening Teeth With Multiple People In The Image

Image copyright Alessandro Valli via Flickr
Now that we’ve covered how to perform simple teeth whitening, we come upon a more complicated scenario: what do when there are multiple people in the image?
Theoretically, the process is much the same. However, it is important to note that different people require individual edits as everyone’s teeth are a different color and tint, and are affected differently by the light in the frame.
Let us take a look.

Here we have an image of a man and a woman. The man’s teeth have already been corrected using the same process as described above. Now we are going to perform the corrections on the woman’s teeth.
Step 1: Making and refining the selection
On the Background copy layer, we will make a selection of the woman’s teeth as described above.
For this we use the Magnetic Lasso tool.

Thereafter, we go to Refine Edge by holding Shift and in the menu, going to Select > Select and mask.
Just as above, we will use the Refine Edge tool to smooth out the edge selection in the woman’s teeth.

Now that a smooth selection is made, we can move on to the edit. This new selection is going to inform all the edits we make further down.
Step 2: Making the edit
With the woman’s teeth still selected, click on the Hue/Saturation tool in the Adjustments Pane.
This will open a new Adjustment Layer on top of the ones already in the Layers Pane called Hue/Saturation 2

Make your adjustments as necessary. Once you are done, Ctrl + Click [Win] or Cmd + Click [Mac] on the Layer Mask to reselect the woman’s teeth.
Then click on the Brightness/Contrast tool to make further edits.
When you are finally done, use the Burn tool to make final touchups to the image. And you’re done!

How to Whiten Teeth Using Photoshop CC 2019 – Quick Summary
- Step 1: Select the teeth in the image by using the Magnetic Lasso tool
- Step 2: Use the Refine Edge tool to refine the selection
- Step 3: Adjust the Hue/Saturation to bring down the yellows in the image
- Step 4: Adjust the Brightness/Contrast to bring out the contrast in the image
- Step 5: Manually paint in contrast by using the Burn tool
- Step 6: For more people, make a new selection using the Magnetic Lasso tool
- Step 7: Repeat steps 1-4 for the new selection
Bonus – Video Tutorial
Hey, I'm a Professional Retoucher making $10k a month thanks to Photoshop.Register to my newsletter to get freelancing tips and a FREE Brush Pack in Bonus! My Newsletter

